 Skip to content
 Welcome, Commander! If you’ve ever found yourself grinding for better tanks, wondering why your shots bounce, or feeling like matchmaking is working against you, you’re not alone. World of Tanks is a game of deep mechanics — but most players only scratch the surface.
This isn’t your typical surface-level article. We’re going full throttle: deep into advanced game mechanics, map tactics, crew skills and hidden mechanics.
TL;DR: Key Takeaways
- Learn tank roles, shell mechanics, and aiming like a pro.
- Equip and crew your tank for maximum combat efficiency.
- Master map control, flanking routes, and ambush points.
- Win big in Clan Wars with strategy and clear communication.
- Maximize credits, experience, and premium account benefits.
- Exploit hidden mechanics like camouflage and view range.
Absolute Beginner’s Guide to World of Tanks
Understanding the Basics of Base Capture
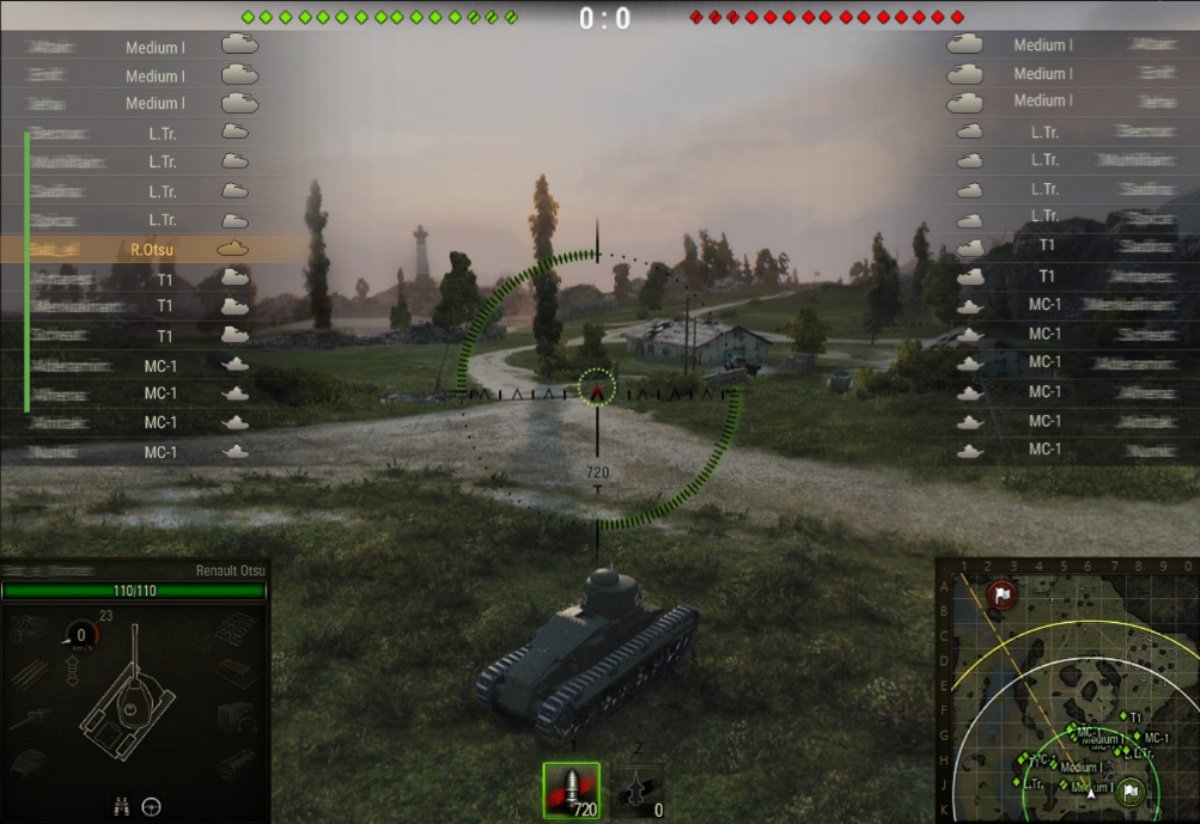
In World of Tanks, a standard battle ends in two ways: complete enemy annihilation or by successfully capturing the enemy base. While blowing up every enemy tank can be thrilling, base capture is often a quicker, more strategic route to victory — especially in tightly contested battles.
The mechanics are straightforward:
- Enter the enemy base’s white cap circle.
- A green progress bar titled “Enemy Base Capture” will appear for your team.
- Progress builds steadily toward 100%, as long as you stay inside the circle and avoid damage.
It’s important to know that each friendly tank inside the cap generates one capture point per second, but the game caps progress at 3 points per second maximum, regardless of how many tanks are inside. So, while swarming the cap with your entire team won’t speed things up beyond this limit, having at least three tanks in the circle is the fastest way to victory.
Why Capture Matters
Many new players overlook base capture as a viable win condition. In truth, smart teams use it to:
- Force aggressive enemy movements.
- Secure victory even when outnumbered.
- Flip the battle when time is running out.
In ranked and competitive play, controlling the cap pressure is an essential part of battlefield dominance.
What Happens If You Leave the Cap?
Base capturing in World of Tanks requires commitment. If you leave the capture circle before completing the capture, your personal capture points are lost, and the progress bar drops accordingly.
But it’s not just leaving the circle that resets your efforts — taking damage has the same effect. Both critical hits (like to your tracks) and hull damage reset your capture points, so situational awareness is critical.
This introduces a tactical layer: while capping, you need to position your tank in a way that minimizes exposure. Use hard cover inside the cap circle, or if cover is scarce, angle your tank effectively and stay mobile to avoid enemy shells.
Pro tip: Artillery players love to aim for clustered tanks in cap circles. Spread out, use buildings or terrain for cover, and keep moving if possible.
Securing the Win: Post-Capture Delay
One commonly misunderstood aspect of base capture in World of Tanks is the post-capture delay. Capturing the base to 100% doesn’t instantly end the game. Instead, there is a minimum 5-second delay before your victory is confirmed.
Why is this important?
- During this window, any remaining enemies can still fight back.
- If your entire team is destroyed within this period, you still lose the battle.
- If both teams are wiped out, or the enemy team captures your base simultaneously, the result is a draw.
Interestingly, this delay extends slightly whenever a vehicle is destroyed during the countdown, according to game experts. So while it might feel like a final countdown, it’s not quite over until the clock hits zero.
Tactical insight: If your team is capping but heavily outnumbered, focus on survival during this delay. Don’t engage unnecessarily. Victory is just seconds away!
Assault and Encounter Modes: Special Capture Rules
World of Tanks isn’t limited to standard battles. Assault and Encounter battles have their own base capture mechanics that every player must understand to succeed.
Assault Mode
In Assault mode:
- Only one team owns a base, and the other team must capture it to win.
- Mechanics remain the same: enter the cap circle, avoid damage, and fill the capture bar.
However, defenders must be hyper-aware of cap pressure and ready to counterattack swiftly. Delaying attackers and resetting their progress can secure victory for the defending team even without full eliminations.
Defensive tip: In Assault, reset enemy cap progress aggressively. Even minor hits to capping enemies can swing the battle.
Encounter Mode
Encounter battles are a different beast:
- A single neutral base sits on the map, available for both teams to capture.
- Capture speed is slower: just one point every 2.5 seconds.
- Critically, if tanks from both teams are inside the cap circle, capture progress halts entirely.
This means that even a lone defender can stall a cap attempt, buying precious time for reinforcements.
Pro strategy: In Encounter mode, prioritize contesting the cap over all else. A timely rush into the circle can stop an imminent enemy win and reset the flow of the match.
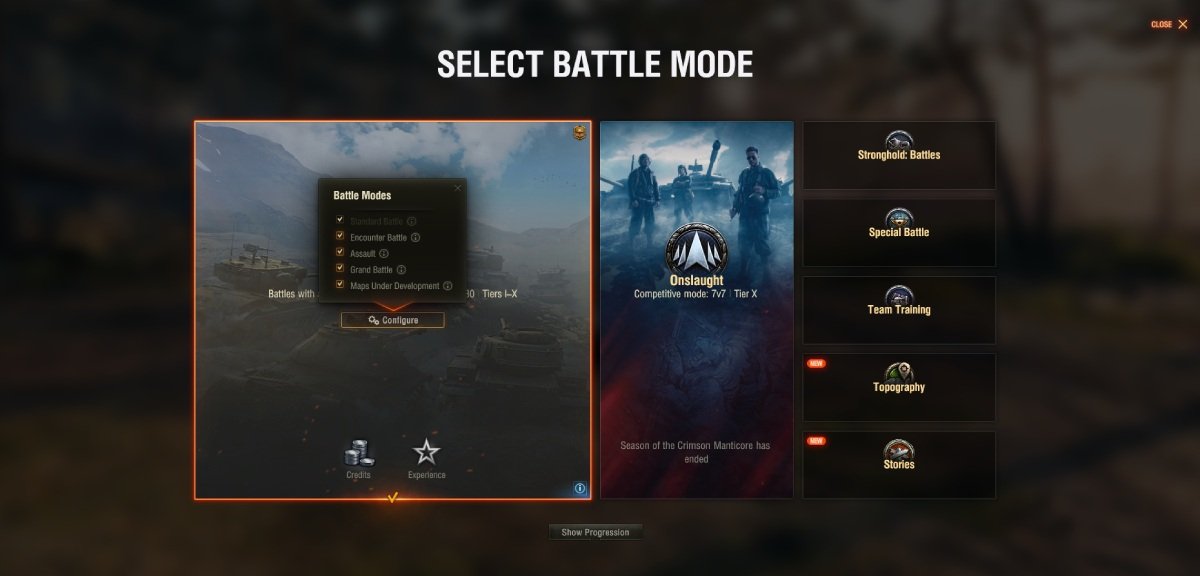
Grand Battle Mode in World of Tanks: Complete Overview
What is Grand Battle Mode?
Grand Battle is a special game mode in World of Tanks designed for large-scale battles. Unlike standard 15 vs. 15 matches, Grand Battles feature 30 vs. 30 players on massive, specially designed maps that are significantly larger than regular maps, typically up to 1.4 km x 1.4 km.
This mode offers more intense, large-scale combat with a broader battlefield, encouraging coordinated team play and providing unique tactical opportunities.
Note: Grand Battle is available only to Tier X vehicles in Random Battles queue. Not all queues or time periods feature this mode, as it can be limited by server region and time.
Key Features
- Team Size:
- 30 players per team.
- Standard matchmaking applies: balanced by vehicle classes.
- Map Size:
- Large maps specifically created for Grand Battles (e.g., Klondike, Nebelburg, Normandie).
- Roughly double the size of standard maps.
- Objectives:
- Similar to Standard Battle mode: destroy all enemy vehicles or capture the enemy base.
- Base capture mechanics work identically, but the larger map scale requires more coordinated efforts to secure the cap.
- Available Vehicles:
- Only Tier X tanks.
- Includes all classes: heavy tanks, mediums, lights, TDs, and SPGs.
- Earning Bonds:
- One unique advantage of Grand Battles is the opportunity to earn bonds, a special currency in World of Tanks.
- Bonds can be used to purchase directives and improved equipment.
- Performance-based rewards: higher performance yields more bonds.
- Unique Medals and Achievements:
- Some medals and personal missions are exclusive to Grand Battles.
Gameplay Dynamics
Scale and Strategy
- Grand Battles amplify the importance of team coordination. With 30 tanks per side, uncoordinated attacks can lead to massive losses.
- Map control is critical. The extended battlefields mean flanking and positional play are more viable and impactful.
- Light tanks shine in reconnaissance roles, providing essential vision across vast areas.
- Artillery (SPG) benefits from large maps, offering long-range fire support across wide zones.
- Tank destroyers can exploit longer sightlines for devastating ambushes.
Tactical Approach
- Expect prolonged engagements — battles tend to last longer than standard modes.
- Splitting forces strategically across flanks is essential to prevent encirclement.
- Communication is vital: pinging the map and coordinating pushes will often decide the outcome.
- Base capture requires sustained control, as enemy reinforcements can arrive from distant flanks.
Advantages of Grand Battle Mode
- Higher intensity and scale: More tanks, more chaos, more tactical depth.
- Earning potential: Bonds and credits accumulate quickly in good performances.
- Advanced tactics: Excellent mode to practice large-scale coordination.
- Vehicle testing ground: Test Tier X vehicles in a larger operational theater.
Disadvantages of Grand Battle Mode
- Requires Tier X: Not accessible for lower-tier players.
- Performance demand: Bigger maps and more tanks can strain lower-end hardware.
- Longer battles: Matches may feel slower-paced due to map size and cautious gameplay.
- Limited availability: Not always present in every region or event cycle.
Tips for Success
- Scout Early and Safely — Use light tanks to spot enemy movements without overcommitting.
- Secure Map Zones — Control key terrain early to deny enemy advances.
- Protect the Flanks — Large maps mean flanks can be exposed; always check the mini-map.
- Coordinate Fire — Focus fire remains critical, even in large battles.
- Be Patient — Use the map size to your advantage for ambushes and repositioning.
Advanced Tactics: Cap Pressure and Psychological Warfare
Base capture is more than a mechanical process — it’s psychological warfare. By pushing onto the enemy cap, you force them to make difficult choices:
- Do they continue their attack or return to defend?
- Do they split their forces, weakening their offense?
- Do they panic and make mistakes?
Smart players use base capture to apply pressure without necessarily intending to complete the cap. Even a partial cap forces the enemy to react, often breaking their formation and creating opportunities elsewhere on the battlefield.
“Fake Capping” for Tactical Advantage
Pretend to cap early in the game to divert enemy forces. Pull them away from key positions, then disengage and strike vulnerable targets elsewhere. This psychological tactic disrupts their strategy and creates openings for your team.
Defensive Play: How to Break Enemy Captures
When the enemy starts capping your base, time is of the essence. Follow these steps:
- Spot the cappers: Use scouts or fast tanks to light up enemies in the cap circle.
- Prioritize firepower: Focus fire on capping tanks. Even a single shot resets their points.
- Send fast interceptors: Medium or light tanks can race back to contest the cap and buy time.
- Use artillery support: SPGs excel at punishing clustered cap attempts from long range.
Remember: you don’t have to eliminate all cappers instantly. Even one reset buys you valuable seconds.
Communication Wins Captures
Team coordination is crucial during base captures:
- Assign a dedicated shot-caller to direct cap attempts and responses.
- Use voice comms or in-game quick commands to coordinate pushes.
- Avoid piling into the cap circle without a plan — structure your attack!
Pro teams often send a combination of heavy tanks to cap (for survivability) and mobile mediums to intercept enemy counterattacks. SPGs provide long-range overwatch, punishing enemies trying to reset the cap.
Know Your Vehicle Types
- Light Tanks: These are the eyes of your team. Light tanks are fast, nimble, and built for speed over armor. Their primary role is scouting: finding enemies and relaying their positions to your team. In battles, light tanks should avoid head-on confrontations, focusing instead on spotting enemy positions and escaping before they can retaliate. Light tanks excel at passive scouting, hiding in bushes while spotting enemies without being seen. Remember, firing your weapon reduces your camouflage value, making it easier for enemies to spot you. Use your speed to relocate quickly and confuse the enemy. Light tanks often have high camouflage ratings, even while moving, making them ideal for stealthy maneuvers. If you enjoy fast-paced gameplay and enjoy the thrill of outmaneuvering enemies, light tanks are a fantastic choice.
- Medium Tanks: Think of medium tanks as your all-rounders. They offer a balance between firepower, mobility, and armor. Medium tanks excel at flanking maneuvers, supporting heavy tanks, and exploiting gaps in the enemy line. In many situations, medium tanks act as the backbone of your team, capable of adjusting their role depending on the battle’s flow. They can rush to defend a collapsing flank, outmaneuver heavier enemies, or provide suppressive fire. If you’re new to World of Tanks, medium tanks are the perfect starting point. They’ll teach you essential skills like positioning, angling, and situational awareness. Medium tanks often carry versatile armaments and benefit from decent view ranges, allowing you to spot and engage effectively.
- Heavy Tanks: These are the juggernauts of the battlefield. Heavy tanks are designed to absorb damage and break through enemy lines. With thick armor and powerful guns, they lead the charge in assaults and anchor defensive positions. When piloting a heavy tank, always angle your armor to maximize its effectiveness. Angling increases the effective thickness of your armor, making it harder for enemies to penetrate. Heavy tanks are ideal for close-quarters combat, where their firepower and armor shine. However, they are slower and less maneuverable than other classes, so map awareness and positioning are critical. Use your formidable presence to control key areas of the battlefield and support your team.
- Tank Destroyers: Tank destroyers are your ambush predators. They excel at long-range sniping and setting up lethal traps for unsuspecting enemies. Most tank destroyers have limited mobility and weak armor, but their firepower compensates heavily. Use camouflage and concealment to stay hidden until the perfect moment to strike. Position yourself in locations with clear sightlines and good cover. Remember, firing your gun will reduce your camouflage value, so always choose your shots wisely. Tank destroyers are best suited for players who prefer a patient and methodical approach to combat, waiting for the enemy to make a mistake before punishing them severely.
- SPG (Artillery): Artillery vehicles, or SPGs, provide indirect fire support from long range. They target enemies hiding behind cover or entrenched in defensive positions. Playing artillery requires understanding map layouts and predicting enemy movements. Aim for clustered enemies or stationary targets to maximize splash damage. Artillery shells follow an arc trajectory, allowing you to hit enemies behind obstacles. While reloading times are long, a well-placed shot can cripple or destroy enemy tanks. SPG players must also remain aware of enemy scouts, as artillery vehicles are vulnerable to fast-moving tanks. If you enjoy a strategic and supportive playstyle, artillery offers a unique perspective on the battlefield.
Pro Tip: Start with medium tanks for balanced gameplay. They teach positioning, firepower, and mobility at once.
Basic Combat: Aiming, Armor & Damage
- Aim for weak spots: In World of Tanks, knowing where to aim is crucial. Each tank has vulnerable areas that, when targeted, can ensure higher damage and critical module hits. Common weak spots include the lower front plate, the commander’s hatch, and the thinner side and rear armor. Exploiting these areas increases your chances of penetrating the enemy’s armor, even if they are well-armored tanks. Study the armor profiles of frequently encountered vehicles to improve your accuracy under pressure. The more familiar you are with enemy weak spots, the more consistently you’ll deal effective damage.
- Use auto-aim sparingly: Auto-aim can be helpful in fast-paced situations or when you’re focusing on dodging incoming fire, but manual aiming is far superior for targeting weak spots and landing precise shots. Auto-aim generally locks onto the center mass of the target, which may not always be the most vulnerable part. In close-quarters combat, manual aiming allows you to quickly adjust your aim to target tracks, fuel tanks, or exposed side armor. Practice manual aiming to increase your damage output and make your shots count in critical moments.
- Armor angling: Angling your tank correctly can make the difference between absorbing damage and getting destroyed. By turning your tank at a 30 to 45-degree angle toward incoming fire, you increase the effective thickness of your armor, making it harder for shells to penetrate. This technique works especially well for heavy tanks but benefits all armored vehicles. Angling also increases the chances of enemy shells ricocheting off your armor, preventing damage entirely. Face-hugging, where you press your tank directly against the enemy’s, can neutralize their gun depression and prevent them from aiming at your weak spots, turning you into an immovable fortress in close combat.
Fun fact: Even heavy tanks need to angle. Face-hugging your opponent while angling can turn you into an immovable fortress.
Advanced Mechanics and Deep Game Systems
Matchmaking Mechanics (MM)
Understanding matchmaking is vital to success in World of Tanks. Matchmaking (MM) determines which opponents and allies you’ll face in battle. Vehicles are placed into battles based on battle tiers, not just vehicle tiers. For example, a Tier 8 medium tank might be placed into a battle with Tier 10 vehicles if the matchmaking rules allow it. Always review the matchmaking chart for your vehicle to understand the battle tiers it can encounter. Awareness of potential opponents allows you to plan your tactics accordingly and avoid unfavorable engagements.
- Battle tiers: These define the range of vehicles you’ll face in battle. Unlike vehicle tiers, which reflect the general progression path, battle tiers indicate your possible opponents in specific matches. Some tanks have preferential matchmaking, which limits them to lower battle tiers, giving you a fighting chance against fewer top-tier threats. Always be aware of your vehicle’s battle tier spread to anticipate enemy capabilities and adjust your strategy on the fly.
- Weight balancing: The matchmaking system attempts to balance teams based on vehicle weights, considering tank types and tiers. Heavier tanks and artillery have greater matchmaking weights. Matchmaker tries to ensure both teams have roughly equivalent firepower and roles. However, due to player availability and matchmaking rules, perfect balance isn’t always possible. Recognize when your team might be at a disadvantage and play more cautiously to compensate. Awareness of team compositions lets you predict battle flow and seize opportunities when they arise.
Shell Types & Penetration
Understanding shell types is essential for maximizing your damage potential in every engagement. Different shells behave differently based on their design, velocity, and intended use. The most common is Armor Piercing (AP). AP rounds are balanced and reliable, offering solid penetration at moderate distances. However, keep in mind that AP shells lose penetration as distance increases, so they are best used at medium ranges. They are the go-to choice in many situations because they are affordable and effective against standard armor layouts.
Next, we have Armor-Piercing Composite Rigid (APCR) rounds. These shells travel at high velocity, making them excellent for fast-moving targets and ensuring quicker flight times. However, their penetration drops off sharply over longer distances, which can result in non-penetrations if fired from afar. Use APCR rounds when you need to hit a critical target quickly at close to mid-range.
High Explosive (HE) shells are ideal for dealing splash damage, especially against soft targets like lightly armored vehicles or modules such as tracks. HE rounds don’t rely on penetration to cause damage, making them perfect for targeting exposed modules or clustered enemies.
Finally, High-Explosive Anti-Tank (HEAT) shells offer high penetration values without losing effectiveness over distance. However, they are less effective against spaced armor or sloped surfaces, where their explosive jets can dissipate before penetrating. HEAT shells excel in close-range brawls where accuracy matters, and armor layouts are predictable.
Tip: Use AP for reliable mid-range shots, HEAT in brawling situations for hard targets, and HE when soft targets or module damage is your priority.
See or Be Seen: Visibility Mechanics in World of Tanks
In World of Tanks, victory isn’t just about firepower or armor. Success is also determined by what you see — or fail to see — on the battlefield. Visibility mechanics in World of Tanks are among the most complex yet crucial systems in the game, and understanding them can make the difference between dominating your enemies or falling victim to invisible threats.
Whether you’re a seasoned commander or a newcomer aiming to sharpen your edge, this article will break down the full depth of how visibility works in World of Tanks. From draw distance to spotting range, server horizon, and even the minimap, let’s dive into the hidden rules of battlefield awareness.
Understanding Visibility: It’s More Than Meets the Eye
World of Tanks isn’t just about what’s in front of your gun barrel. The game operates on layered visibility mechanics, shaped by both server performance needs and technical rendering limits.
Wargaming has openly stated that the current spotting system consumes nearly 30% of the server resources required for a battle. To maintain smooth performance, the game must carefully manage how information is displayed to players. That means not everything happening in the game world will be visible to you at all times, even if you think it should be.
Visibility is determined by three often-confused terms:
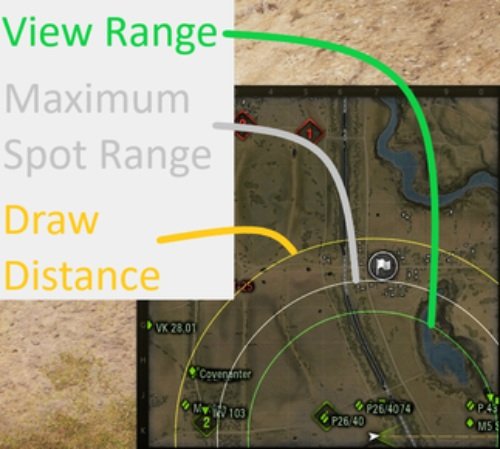
- Draw Distance
- Spotting Range
- View Range
Understanding the difference between these will change the way you play.
Draw Distance: Rendering the Battlefield
Draw Distance refers to the maximum distance at which objects are displayed in your game client. It’s purely a technical limitation tied to the capabilities of your PC and game settings. The maximum draw distance in World of Tanks is 707 meters. However, this number doesn’t mean you’ll automatically see every enemy within this range — there are more factors at play.
The game world is rendered as a series of cubes. The map is essentially a cube, and within that space, an invisible cube is centered around your camera viewpoint. This is your draw distance cube. Objects at the boundaries of this cube start to fade into the fog, while those beyond its limits are invisible.
Adjusting Draw Distance in Settings
You can manage draw distance through Game Settings → Graphics → Draw Distance, where you’ll see three options:
- High: ~1600m cube (map-dependent, best visual clarity)
- Medium: ~1100m cube
- Low: ~900m cube
For players with lower-end PCs, reducing draw distance improves frame rates, but it comes at the cost of battlefield awareness. Unless your frame rate is suffering, you should always opt for the highest draw distance available to maximize situational awareness.
Pro Tip: Higher draw distance doesn’t impact spotting enemies directly (that’s handled by spotting range and server horizon), but it ensures that if enemies are spotted, your client will display them fully.
Server Horizon: What the Server Lets You See
Even with your draw distance set to maximum, there are server-side limitations that govern what information your client receives.
The server maintains a 1000m x 1000m x 1000m cube centered on your tank — called the server horizon cube. Dynamic objects like moving enemy vehicles, falling trees, or tracer fire outside this cube will remain completely invisible to you, regardless of your draw distance setting.
What does this mean in practice?
- Tanks outside the server horizon won’t be displayed, even if your draw distance theoretically covers them.
- This limitation ensures server performance remains stable by not overloading your client with unnecessary data.
Interestingly, if an enemy tank is technically visible on the server but you’ve chosen a lower draw distance, the game interface will still display a vehicle marker above the invisible tank. If you press Alt (with the default UI), you’ll see the marker, even though you cannot see the tank itself.
Self-Propelled Guns (SPGs) have a special advantage here. When using Strategic View, artillery players receive information about all dynamic objects within their viewport, giving them a better understanding of battlefield movements outside the regular draw distance.
Spotting Range: Lighting Up the Enemy
Spotting range is the game mechanic that determines the maximum distance at which you can “light up” enemy vehicles. Unlike draw distance, spotting range is hard-capped at 445 meters, no matter how good your tank’s view range is.
However, having higher view range stats still matters. Extra view range boosts your ability to counteract enemy camouflage and improves your chances of spotting tanks hiding in bushes or using terrain to their advantage.
Key fact: You cannot spot enemies beyond 445 meters yourself, but you will still benefit from allies who spot enemies for you within your draw and server horizons.
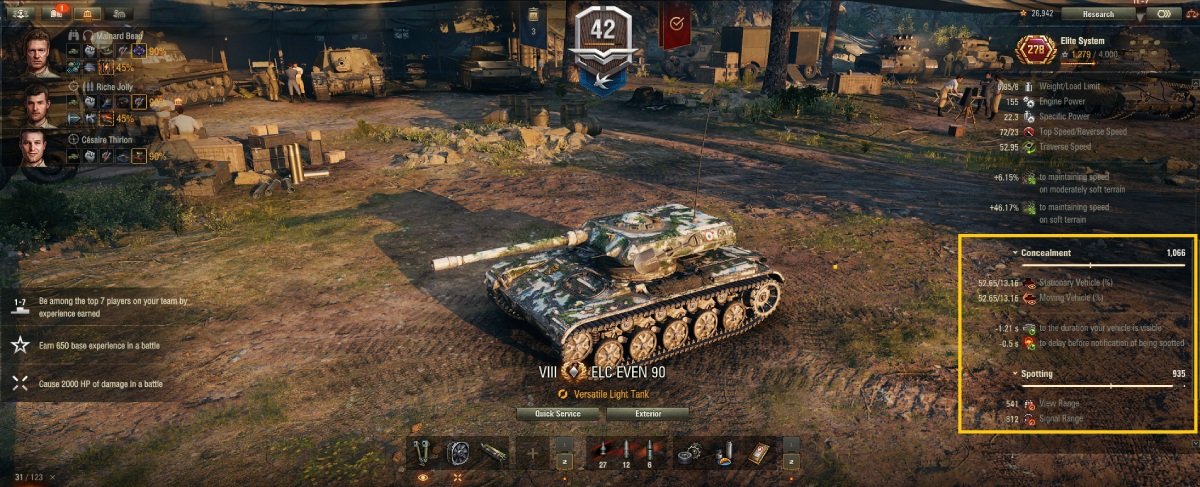
View Range: Understanding Tank Stats
Every tank in World of Tanks has its own view range value. This stat helps determine your ability to spot enemies, but it has no maximum cap of its own. Instead, it’s used in spotting range calculations.
While you can’t exceed the spotting cap of 445 meters, boosting your view range with equipment like Coated Optics or skills like Recon and Situational Awareness reduces the effect of enemy camouflage and increases the reliability of spotting targets at distances up to the cap.
Pro Tip: Light tanks excel in view range roles, as their naturally high base values make them ideal scouts.
Minimap: Tactical Awareness at a Glance
Your minimap in World of Tanks operates independently from the 3D world’s visibility mechanics. Even if you can’t see a tank in the main game view due to draw distance or server horizon limitations, its position will still appear on the minimap — as long as it’s within radio range.
The minimap is your battlefield command center:
- Always keep an eye on it.
- Use it to track spotted enemies.
- Spotting by allies will update enemy locations on your minimap, even beyond your view range.
Using the minimap effectively lets you anticipate enemy movements, avoid ambushes, and make informed tactical decisions.
Performance Tips: Maximize Your Vision
To get the best visibility experience in World of Tanks:
- Set your draw distance to maximum if your hardware allows.
- Train your crews in Recon and Situational Awareness skills.
- Equip Coated Optics or Binocular Telescope for passive view range boosts.
- Regularly check your minimap for updates.
- If you play SPGs, take full advantage of Strategic View for battlefield oversight.
These optimizations ensure you stay fully informed of your surroundings, giving you an edge over less-prepared opponents.
How to Master Spotting and Camouflage in World of Tanks: The Invisible Battlefield
When you think of World of Tanks, you probably imagine explosive artillery barrages and armored giants clashing head-on. But beneath the surface, one of the most sophisticated and decisive mechanics in the game is far less obvious: visibility. Spotting, view range, camouflage — these factors define who shoots first and who gets vaporized without ever seeing their enemy.
If you’ve ever been ambushed by an invisible tank or wondered why you spotted an enemy just a second too late, this guide is for you. We’re about to fully unpack the hidden game within the game: how World of Tanks visibility mechanics work, and how you can use them to gain an undeniable edge.
Understanding View Range: The Foundation of Spotting
First, let’s get clear on the concept of View Range in World of Tanks. Despite its name, view range is not the actual distance at which you’ll see enemy tanks visually in 3D. Rather, it’s your tank’s theoretical spotting potential, driven by factors like:
- Tank turret and base stats
- Commander’s skill level
- Crew perks like Recon and Situational Awareness
- Equipment such as Coated Optics and Binocular Telescope
- Premium consumables, like Case of Cola for American tanks
In fact, with the right combination, you can push view range to nearly 598 meters (as achieved with tanks like the Patton, full crew skills, Brothers in Arms, premium equipment, and consumables).
However, view range itself does not dictate how far you see tanks — it’s just a parameter in the formula for spotting enemies, mainly helping you cut through their camouflage bonuses at distances up to the spotting cap.
Important: View range is unlimited in theory. Unlike draw distance or spotting range, it has no hard cap, and better view range always increases your effectiveness.
Spotting Range: The Real Detection Limit
Now, let’s turn to Spotting Range — the actual maximum distance at which you can detect enemies in the game.
No matter how high your view range, the maximum spotting distance is hard-capped at 445 meters. Beyond this, the game engine performs no spotting checks. Picture it as an invisible bubble surrounding your tank.
However, not every enemy inside this bubble is instantly revealed. Spotting range depends on the enemy’s camouflage value, your view range, and whether you have an unobstructed line of sight.
Spotting Range works both ways — your tank is also vulnerable within that 445-meter bubble if the enemy has superior view range and your camouflage is weak.
Minimum Spotting Range: 50 Meters
There is one exception to line-of-sight requirements: proximity spotting. If an enemy tank is within 50 meters, they’re instantly revealed, no matter if a building or rock blocks your view.
Proximity spotting is incredibly useful on tight maps and choke points. You can stay concealed while the enemy unknowingly enters your auto-spotting zone.
Calculating Spotting Range: Not So Simple
Spotting isn’t a static number. Your actual spotting range varies for every potential target based on:
- Your view range
- Target’s camouflage rating
- Environmental factors like bushes and trees
- Whether they fired their weapon recently (firing reduces camouflage)
The basic formula looks like this:
Spotting Range = Your View Range – (Your View Range – 50) × Target’s Camo Factor
For example:
- If you have a 400m effective view range, and the enemy tank’s camouflage factor is 0.9, your spotting range for them becomes:
400 – (400 – 50) × 0.9 = 95 meters
Meaning, despite your strong view range, their camouflage means you’ll only spot them when they’re within about 95 meters.
This is why boosting your view range and reducing enemy camouflage are so critical in high-level play.
Visibility Checks: Timing Matters
Spotting doesn’t happen in real time! The server performs visibility checks at fixed intervals based on distance:
- Within 50 meters: Every 0.1 seconds
- Within 150 meters: Every 0.5 seconds
- Within 270 meters: Every 1.0 second
- Within 445 meters: Every 2.0 seconds
This delay means you won’t necessarily spot an enemy the instant they leave cover. A fast-moving tank can dart out, fire, and retreat before the next check occurs — remaining completely hidden.
That’s why light tanks zipping around at 72 km/h can dodge detection, especially at longer distances.
How Spotting Happens: Vision Ports and Checkpoints
Spotting checks use two elements:
- Your View Range Ports: Two spots on your tank (one static, one dynamic linked to your turret).
- Enemy Visibility Checkpoints: Six points on enemy tanks (top of turret, gun mount, hull front, hull rear, left turret, right turret).
Every two seconds, the server alternates between your static and dynamic view range ports, casting “vision rays” toward the target’s checkpoints.
- If at least one vision ray reaches a checkpoint unobstructed, you spot the target.
- If all rays are blocked by solid objects, the target remains hidden.
Note: Terrain and objects like houses block vision rays, but other tanks (both friendly and enemy) do not.
Camouflage Mechanics: Invisible Armor
The enemy’s camouflage value plays a vital role in whether you detect them at all.
Camouflage is calculated from multiple factors:
- Base Camo: Pre-set by tank type (light tanks generally have higher base camo).
- Crew Skill: Higher camouflage skills improve effectiveness.
- Equipment: Camouflage Net, permanent or rental camo patterns.
- Environment: Bushes and trees boost camouflage (up to 64% bonus).
- Movement & Firing: Moving reduces camouflage, firing slashes it dramatically within 15 meters of foliage.
Example:
Imagine your tank is hidden in a dense bush with full camo equipment and crew training. While stationary:
- Base camo: 0.25 (25%)
- Crew camo skill boosts: ~113.4%
- Environmental bonus: ~64%
Your effective camo factor skyrockets to approximately 87% — making you nearly invisible until enemies are well inside their own spotting range.
However, if you fire your gun, that changes.
- Environmental bonuses near your tank drop to 30%.
- Camouflage nets lose effect if you move.
That’s why passive scouting (remaining hidden and not firing) is so effective.
Spotting Duration: Once Lit, Stay Lit
Once an enemy is spotted, they stay visible for at least 5 seconds, sometimes up to 10 seconds, even if they retreat or the spotter is destroyed.
The Designated Target perk for your gunner extends this duration, ensuring enemies remain visible longer — a huge advantage for artillery or sniping teammates.
Pro Tips for Superior Spotting
Here are actionable strategies to maximize your spotting game in World of Tanks:
- Boost Crew Skills: Train Recon and Situational Awareness.
- Stack Equipment: Use Coated Optics, Binocular Telescope, and Improved Ventilation.
- Stay Behind Bushes: Position at least 15 meters behind foliage for full camouflage benefits.
- Passive Scout: Use light tanks with high base camo to light enemies without firing.
- Use Proximity Spotting: Hold tight choke points and let enemies drive into your 50-meter zone.
- Time Your Shots: Fire only when necessary — shooting drops your camouflage massively.
Radio Range, Terrain Physics, and Tactical Movement
When you think about World of Tanks, the first thing that comes to mind is often the clash of armored giants or the precision of sniping across massive maps. But while firepower and armor are crucial, battles are often won before the first shot is fired — through superior movement, battlefield positioning, and communication. Understanding your tank’s mobility, radio range, and how these mechanics interact is the hidden edge that separates average players from true commanders.
In this advanced guide, we dive deep into two essential, but often misunderstood, pillars of battlefield dominance: Radio Range and Movement Mechanics. If you want to move smarter, communicate better, and outplay your enemies even before the firefight starts, read on.
How Radio Range Works
Each vehicle in World of Tanks is equipped with a radio. Your effective radio range is determined by:
- Your tank’s base radio specifications
- Your Radio Operator’s skill level
- Perks and consumables enhancing communication efficiency
Two friendly tanks can communicate if they are within the sum of their individual radio ranges. For example, if your tank has a 300m range and your ally has 500m, you’ll share information up to 800m apart.
What information is shared?
- All enemies spotted directly by you
- All enemies spotted directly by any friendly tank within your radio range
- The position and health status of these vehicles
However, it’s important to understand that radio communication is not chained. You only receive intel from direct communication partners — not from tanks linked via other allies.
Tactical Impact of Radio Range
Let’s say you’re in a tank destroyer, positioned defensively, scanning down a long corridor but spotting no enemies. If a friendly scout drives forward and lights up an enemy tank at the far end, you will see that enemy — as long as you’re within radio range of the scout.
Without proper radio coverage, blind spots appear on the map, leaving you exposed to ambushes or forcing you to play cautiously. Strong communication nets allow you to play aggressively, knowing that hidden enemies will be revealed by your allies.
Pro Tip: Before deploying to battle, check your team composition and identify gaps in radio coverage. Stick close to teammates with strong spotting abilities and ensure you’re inside their communication range for maximum battlefield awareness.
Mastering Tank Movement Mechanics: Speed Meets Strategy
In World of Tanks, movement is not just about getting from A to B. How you move, where you move, and how quickly you can reposition often dictates your survival.
Let’s unpack the critical components of tank mobility.
Engine Power and Acceleration
Your tank’s ability to accelerate depends primarily on its engine power-to-weight ratio.
- More engine power: Faster acceleration
- Higher weight: Slower acceleration
Consumables such as fuel boosts can temporarily increase your engine power, helping you escape dangerous situations or charge into battle more effectively.
But engine power isn’t the whole story. Terrain and elevation also play pivotal roles.
Terrain Resistance
World of Tanks recognizes three types of terrain:
- Hard ground: Roads, pavement, cobblestones (fastest movement)
- Average ground: Dirt paths, sand, shallow water (moderate speed)
- Soft ground: Swamps, deep water, mud (slowest movement)
Even if your tank has powerful acceleration, soft ground will slow you down dramatically. Notably, some soft ground areas, like swamps on maps like Karelia or Lakeville, are deceptively dangerous because they visually resemble normal grass but sap your mobility.
Pro Tip: Upgrade your suspension when possible. Better suspensions reduce terrain resistance, allowing smoother movement across all surfaces.
Top Speed: More Than a Number
Your tank’s listed top speed isn’t a guarantee. It represents your vehicle’s transmission limit, but you’ll often only reach this speed downhill or with a power boost.
For many tanks:
- Reaching top speed on flat ground is rare.
- Heavier tanks may never hit their listed top speed.
- Some light tanks exceed their nominal limit when terrain conditions favor them.
Understanding your actual achievable speed helps in timing flanking maneuvers, escaping artillery fire, and planning aggressive pushes.
Hull Traverse Speed: Turning the Tide
Your tank’s ability to pivot is known as hull traverse speed — and it matters tremendously in close combat.
- Suspension upgrades often improve traverse speed.
- Engine upgrades indirectly improve turning but aren’t reflected in UI stats.
For example, an E-75 heavy tank with its stock engine shows a modest traverse speed of 21°. However, once upgraded to its top 1200 hp engine, it performs rotations far more efficiently than expected.
Additionally, some tanks can pivot in place, allowing sharp turns even when stationary, while others require forward or backward momentum to turn.
Tip: Test your tank’s traverse behavior in Training Room mode. Knowing how fast you can turn determines your ability to counter flanking attacks or dodge incoming fire.
World of Tanks Physics: Movement Revolution
Since version 0.8.0, World of Tanks introduced an advanced physics system, making mobility mechanics more realistic and dynamic than ever.
Hills and Slopes
Previously, invisible walls restricted movement. Now, your tank’s weight, horsepower, and approach speed determine if you can scale inclines. Fast tanks can climb unexpected routes, surprising enemies and opening flanking paths.
Water Hazards
Entering deep water triggers a warning icon. Stay submerged too long, and your tank will drown, ending your game. Always recognize water depth zones on maps like Lakeville and Swamp to avoid deadly mistakes.
Drifting and Sliding
Fast tanks executing sharp turns will drift, allowing stylish (and tactical) slides around corners. Use this to evade fire or reposition quickly during mobile engagements.
Ramming and Kinetic Force
Ramming now displaces enemy tanks physically, not just dealing damage. With the right momentum, you can push enemies off cliffs, into water, or flip them over entirely.
Friendly tanks can also be pushed — use this to assist slow allies climbing hills or escaping tough positions.
Strategic Movement: Combining Mechanics for Victory
Mastering mobility is about more than understanding individual mechanics. It’s about combining them into effective battlefield strategies.
Positioning
Use your knowledge of terrain resistance to reach key map positions faster than your enemies. Avoid soft ground in early-game sprints to spotting zones.
Flanking
Lighter tanks with superior acceleration and traverse can exploit openings to flank heavy tanks stuck in soft terrain or slow-turning turrets.
Escape Routes
Always plan multiple escape paths. Understanding your tank’s speed and traverse lets you disengage from unfavorable fights and reposition effectively.
Radio Awareness
Keep in mind your radio range while moving. Stay within communication range of scouts to receive enemy intel, and avoid overextending into isolated positions without radio support.
The Basics of Aiming in World of Tanks
Automatic Aiming (Auto-Aim)
Automatic aiming is a handy tool for moments when you’re dodging enemy fire or need to keep moving while firing. When you right-click on a target, auto-aim locks onto the lower section of the tank closest to you. This makes it somewhat unreliable for hitting weak spots, especially against well-armored foes. Auto-aim is most effective in close-quarters combat or when pursuing lightly armored vehicles. However, it has critical limitations—it does not account for the enemy’s movement, armor angling, or terrain elevation. It’s a helpful fallback, but manual aiming is your true path to precision.
Manual Aiming for Precision
Manual aiming allows you to fully control your shots. Unlike auto-aim, it lets you target specific weak spots like the lower front plate, commander’s hatch, or track wheels to immobilize enemies. Every shell has its own trajectory and speed, so practice is key. Learn the behavior of different guns, especially shell velocity and drop. Arcade View gives a wide perspective but can make aiming near obstacles tricky. Sniper View, accessed by zooming in, offers greater precision by providing a direct line of sight from your gun’s perspective. Use Sniper View to hit small or distant targets accurately but beware of tunnel vision!
Sniper View vs. Arcade View
Sniper View is your go-to for precision aiming. Unlike Arcade View, Sniper View eliminates issues with elevated aiming near buildings and terrain, aligning your aim with the gun’s bore axis. This allows you to place shots accurately on enemy weak spots. Remember, though, while zoomed in, you lose battlefield awareness—keep an eye on the minimap to avoid ambushes. Arcade View provides a broader battlefield overview but can suffer from parallax issues near obstacles. Use a combination of both views depending on the situation: Arcade for awareness, Sniper for accuracy.
Advanced Aiming Techniques
Understanding the Penetration Indicator
The penetration indicator is an essential feature of your aiming reticle. It uses a color code to show the likelihood of penetrating your target’s armor:
- Red: Armor is too thick—avoid this shot.
- Yellow: Uncertain chance of penetration due to armor variability.
- Green: High chance of penetration—take the shot!
However, it’s not foolproof. The indicator doesn’t account for shell normalization, impact angles, or potential ricochets. Always combine indicator information with knowledge of armor layouts and weak spots for best results.
Leading Moving Targets
Leading a moving target is an art. If your target is moving perpendicular to your position, you must aim ahead of them, accounting for their speed and the shell’s travel time. For example, if your shell speed is 1,000 m/s and the enemy tank is 500 meters away moving at 20 m/s, you should aim roughly 10 meters ahead. Remember to factor in server lag and your ping, especially with slower shells like high-explosive rounds. Practice makes perfect—try different lead distances in training battles to hone your prediction skills.
Ballistic Trajectory and Line of Sight
Shells follow a ballistic trajectory, meaning they arc over distance. When aiming over terrain, you might have line-of-sight issues, especially with high-arc guns like howitzers. In Sniper View, your aim point is closer to the ground level, while Arcade View elevates your aim perspective. Use Arcade View when firing over obstacles. Remember, auto-aim ignores line-of-sight limitations, which can help in tricky scenarios, but it does not solve trajectory considerations. Mastering the interplay between trajectory and line-of-sight is crucial for consistent accuracy.
Mastering Accuracy and Dispersion
Understanding Dispersion
Dispersion determines the random spread of your shells within the aiming circle. Even perfectly aimed shots can miss due to dispersion. The game uses a Gaussian distribution, meaning most shots land near the center, but a few will deviate towards the edges. Gun accuracy stats, expressed in meters at 100 meters range (e.g., 0.32), indicate dispersion size. The farther your target, the larger the effective dispersion radius. Manage dispersion by fully aiming before firing and minimizing movement penalties.
Accuracy Penalties Explained
Your gun’s accuracy is not fixed—it fluctuates based on several factors:
- Turret rotation: Rotating your turret increases dispersion.
- Vehicle movement: Moving forward, backward, or rotating your tank widens the aiming circle.
- Firing your gun: Shooting temporarily increases dispersion until your gun re-aims.
- Damaged gun or gunner: Injuries or damage halve accuracy until repaired or healed.
To maintain peak accuracy, stop your tank, let your gun settle, and aim fully before firing. Equip stabilizers and train crew skills like Snap Shot and Smooth Ride to reduce penalties.
Aiming Time and the Dispersion Circle
Aiming time is the period it takes for your dispersion circle to shrink after moving or firing. The listed aiming time in-game refers to the time needed to reduce the circle to one-third of its maximum size. Factors like crew injuries or equipment affect this time. Equip Gun Laying Drives to decrease aiming time and improve follow-up shot accuracy. Monitor the circle’s contraction visually to time your shots for maximum precision.
Special Considerations for SPGs: Strategic View
Self-propelled guns (SPGs) use a unique Strategic View, offering a top-down perspective of the battlefield. This view helps align shots using terrain contours and target positioning. The aiming circle in Strategic View adjusts dynamically based on terrain slope and your gun’s ballistic trajectory. Use this to your advantage by selecting targets on open terrain or behind minimal cover. Remember, Strategic View allows you to place the view directly via the minimap, enhancing your ability to support teammates and suppress enemy positions effectively.
Advanced Pro Tips
- Minimize movement penalties: Stop before firing for tighter dispersion.
- Use camouflage and distance: Engage from range while concealed to maximize survivability.
- Learn your gun’s shell velocity: Fast shells require less lead, slow shells need significant prediction.
- Monitor server reticle: Use CapsLock + 0 to view server aim reticle for lag compensation.
- Aim for module damage: Target tracks or fuel tanks to immobilize and burn enemies.
Penetration Mechanics in World of Tanks
Why Penetration Mechanics Matter in World of Tanks
In World of Tanks, landing a shot is only half the battle. Whether that shot actually penetrates your target’s armor is determined by a complex set of calculations. If your shell fails to penetrate, you won’t deal hit point damage — at best, you might cause minor critical damage to external modules or tracks. At worst, it’s just a wasted shot and a giveaway of your position.
The penetration system exists to simulate realistic tank warfare where armor, angles, and shell design play pivotal roles. Once you understand this, you’ll be able to:
- Predict which parts of enemy tanks to target.
- Position your own tank to maximize your armor’s effectiveness.
- Choose the correct ammunition type for the situation.
- Adjust your tactics based on shell velocity and armor profiles.
Impact Angle: The First Line of Defense
The angle at which your shell hits enemy armor is one of the most important factors in penetration. Ideally, you want to hit the armor plate perpendicularly (90° to the surface). The more oblique the angle, the more armor your shell has to punch through.
Here’s why: as the angle increases away from the perpendicular, the effective armor thickness increases exponentially. For example:
- At 0°, a 100mm plate is effectively 100mm thick.
- At 30°, it becomes about 115mm.
- At 60°, it’s doubled to 200mm.
- At 70°, it skyrockets to nearly 300mm.
In simple terms, angling increases armor protection dramatically. That’s why experienced players angle their tanks during fights. Likewise, you should always aim at the flattest surface available on your target.
Shell Normalization: Flattening the Odds
Different shell types behave differently when they hit angled armor:
- AP (Armor Piercing) and APCR (Armor Piercing Composite Rigid) shells benefit from normalization. This mechanic slightly “flattens” the angle of impact, effectively reducing the armor’s thickness at the point of hit.
- For APCR shells, the normalization is around 2°, which can make a meaningful difference, especially when targeting sharply angled plates.
- HEAT and HE shells do not benefit from normalization. They strike armor at the true angle of impact, making them more vulnerable to bounce at steep angles.
The takeaway: when facing well-angled armor, switching to AP or APCR can improve your chances of penetrating.
Ricochet: The Bounce that Saves Lives
One of the most frustrating (or relieving) moments in World of Tanks is seeing a shot ricochet. Here’s how it happens:
- For AP and APCR shells, if the normalized impact angle exceeds 70°, the shell will automatically ricochet, regardless of its penetration power.
- For HEAT shells, the ricochet threshold is slightly higher, at 85°.
Note: Ricochet does not occur when hitting external modules like tracks or observation devices. These components absorb the impact without applying the ricochet rule.
Pro tip: Angling your tank beyond 70° can save you from incoming AP/APCR shots, but beware of overmatching (which we’ll explain next).
Overmatch: When Bigger Guns Break the Rules
Overmatch is a special rule that applies when the attacking shell’s caliber is at least:
- Twice the thickness of the armor it strikes: increased shell normalization applies.
- Three times the thickness of the armor: automatic penetration, regardless of angle (no ricochet).
For example, a 120mm shell striking a 40mm plate will always penetrate, no matter how steep the angle. This is why thin-skinned vehicles and certain lightly armored spots (like turret roofs and hatches) are vulnerable to large-caliber guns.
Pro tip: Memorize armor thickness of common enemy tanks to exploit overmatch opportunities.
Effective Armor Thickness: The Invisible Wall
As explained, armor is more than just its listed thickness — it’s about effective thickness, which combines the actual armor value with the impact angle.
Formula:
Effective Armor = Nominal Armor ÷ Cosine (Impact Angle)
The results can be dramatic:
- 100mm plate at 30° impact angle ≈ 115mm effective thickness.
- Same plate at 60° ≈ 200mm effective thickness.
Always look for flat surfaces or aim to reduce your shooting angle. Flanking shots on the side armor, or aiming at flat turret faces, dramatically improve your penetration chances.
Penetration Randomization: Rolling the Dice
No matter how well you aim, World of Tanks includes an RNG (random number generator) element in penetration:
- Each shot’s penetration value is randomized by ±25%.
- If your gun’s average penetration is 200mm, your actual shot could vary between 150mm and 250mm.
This randomization adds unpredictability to every engagement, simulating real-world shell inconsistencies. It’s one reason why seemingly “safe” shots sometimes bounce, while “impossible” shots occasionally punch through.
Pro tip: Against tough opponents, always assume the lower end of your penetration range to play it safe.
Penetration Loss Over Distance: Speed Matters
Shell velocity matters — fast-flying shells retain penetration over long distances better:
- AP shells: Low penetration loss over distance.
- APCR shells: Higher penetration loss, though tier 10 mediums have less.
- HE and HEAT shells: No penetration loss at any range.
At long ranges, APCR shells can lose significant penetration power, making AP a better choice in some situations. If you’re sniping, keep an eye on your ammunition type!
Double Penetration: Damage Beyond the Armor
After penetrating the outer shell of a tank, your shot doesn’t necessarily stop:
- Shells continue for ten times their caliber inside the tank.
- If the shell still has penetration power left after passing through the outer armor, it can damage internal modules or crew.
- However, shells do not pass through tanks to hit others behind them.
Understanding double penetration helps maximize module damage. Aim for areas behind external armor where vital modules (like ammo racks) are located.
Armor Penetration Indicator: Your Best Friend
Thankfully, World of Tanks provides a built-in visual tool:
- Red marker: No chance of penetration.
- Yellow marker: Penetration is possible but uncertain.
- Green marker: High chance of penetration.
However, remember this indicator does not account for RNG or shell dispersion, and it assumes a flat trajectory. It’s an excellent guideline, but your own knowledge of angles, shell types, and armor layouts will always serve you better.
Damage Mechanics in World of Tanks
In World of Tanks, damage mechanics are complex, intricate, and pivotal to winning. Understanding how your shells interact with armor, modules, and internal crew can be the difference between a well-deserved victory and a frustrating defeat. In this guide, we will explore the hidden depths of the damage system, from shell types to internal explosions, all while optimizing your gameplay strategy.
Shell Damage: The Journey Begins
When you fire a shell in World of Tanks, it carries specific damage potential. While the game shows you the average potential armor damage, there’s more beneath the surface. Each shell type also has hidden potential for module and crew damage, separate from its armor damage value. For lower-tier vehicles, shells often deal more critical damage than pure armor damage due to higher module hit points. Conversely, at higher tiers, armor damage becomes dominant.
Just like penetration, shell damage has a built-in randomization of +/- 25%. The value you see in the game is the average, but actual damage fluctuates within this range. It means every shot carries a bit of unpredictability, adding intensity to every engagement.
Armor Damage Explained
Every tank in the game has a hit point pool. When you take armor damage, your tank’s HP is reduced. Zero HP means destruction. Simple, right? Not quite. World of Tanks features spaced armor, which complicates things. Spaced armor acts as a buffer, protecting the hull beneath from direct damage, especially from explosive shells.
For shells like AP, APCR, and HEAT, damage is applied only if they penetrate the vehicle’s main armor. If they do, you receive the full damage potential (again, +/- 25%). There’s no partial damage — it’s all or nothing.
HE Shells: High-Explosive Complexity
High-Explosive (HE) shells function differently. If an HE shell penetrates your armor, it inflicts full listed damage. But even if it doesn’t, it still explodes at the impact point, potentially damaging your vehicle and modules. Damage calculation for non-penetrating HE shells considers distance from the blast point to the target and the effectiveness of armor at that location.
Interestingly, if an HE shell impacts spaced armor, it will explode on the external layer, and the remaining blast is further reduced before potentially damaging the internal hull. Mastering the use of HE shells can turn a battle, especially against thin-skinned vehicles.
Module and Crew Damage Mechanics
Modules and crew members have their own hit points and are distinct from the vehicle’s HP pool. You’ll notice three states of module health:
- Default: Fully operational.
- Yellow: Damaged but still functioning at reduced capacity.
- Red: Inoperable, although some modules can auto-repair over time to a yellow state.
Crew members have two states: alive or knocked out. Consumables can revive them if they’re not all eliminated. Key modules like the ammo rack and engine can cause catastrophic failures — a destroyed ammo rack detonates the tank entirely, while a destroyed engine can start fires.
Modules have a “saving throw” — a built-in chance to resist damage. For example, the engine and fuel tank have a 45% chance of taking damage when hit, while the ammo rack has a 27% chance. Crew members, when hit by AP shells, have a base 33% chance of being knocked out.
Fire Damage: Playing With Flames
Fire damage is a critical threat in World of Tanks. Tanks catch fire primarily from destroyed fuel tanks or critical engine hits. While burning, your tank continuously loses HP and suffers module and crew damage. Fire damage rate and duration depend on your tank’s design and crew skills, like Firefighting and Preventative Maintenance.
Automatic fire extinguishers can save your tank, instantly dousing the flames. Manual extinguishers require your attention but offer similar benefits when timed right.
Ramming Damage: Turning Mass into Mayhem
Ramming is a calculated risk. The collision formula is straightforward: kinetic energy (0.5 x combined weight x relative speed squared) determines the damage potential. Heavier tanks at high speed can devastate lighter opponents. Damage is proportionally distributed, so in a 75-ton vs. 25-ton ramming situation, only 25% of the energy affects the heavier tank.
To maximize ramming effectiveness, use the Controlled Impact skill and equip a Spall Liner for added protection. Always angle your tank to maximize armor effectiveness when faced with an incoming ram.
Zero Damage Hits: The Mystery Explained
“Zero damage” hits are infamous in World of Tanks. These are mostly due to shells striking spaced armor, external modules, or missing internal critical areas. While frustrating, they are not random — understanding shell travel paths and target vulnerabilities helps reduce these occurrences.
Remember, visual feedback might not always accurately reflect shell behavior. Ricochets, hits to external equipment, or modules like tracks can produce sound effects and hit markers without causing HP damage.
Ghost Shells: Myth or Reality?
Ghost shells — shots that seemingly disappear — usually result from visual desynchronization or network lag. The server determines hit detection, and in rare cases, latency can make it appear as if a shell vanished. Sometimes, vehicle collision models contain gaps, or visual elements like boxes and fuel tanks have no hitbox, allowing shells to pass through harmlessly.
Replays or alternative viewing angles can clarify these confusing moments, revealing the true trajectory and impact of your shots.
Damage Per Shot and Damage Per Minute (DPM)
Two key metrics determine a tank’s offensive power:
- Alpha Damage (Damage Per Shot): The damage you deal with a single shot. Tanks with high alpha typically have longer reloads, making every shot count.
- Damage Per Minute (DPM): The total damage you can deal in sustained combat. Tanks with lower alpha often compensate with higher rates of fire, maximizing DPM.
An alternative metric is “First-Shot DPM,” which accounts for shells already loaded at battle start. High-alpha tanks shine in this category, allowing significant initial bursts of damage before reload times factor in.
Ammunition Rack Explosions: Instant Obliteration
An ammo rack detonation is one of the most destructive outcomes in the game. If your ammo rack reaches zero HP, your tank is instantly destroyed, regardless of remaining vehicle HP. You can mitigate this threat with Wet Ammo Rack equipment or by training the Safe Stowage perk on your loader.
Keeping your ammo rack protected is vital, especially for tanks with exposed rack positions. Angling your armor and avoiding repeated hits in vulnerable areas helps preserve your firepower.
Critical Damage and Saving Throws
As shells travel through a tank after penetration, they can damage multiple components. However, modules and crew do not automatically suffer damage just because they’re hit. Each has a chance to resist, known as a “saving throw.” Higher-tier players capitalize on this knowledge, targeting modules that yield the highest tactical advantage, such as immobilizing a fast flanker or igniting an enemy’s fuel tank.
Consumables like repair kits and med kits restore damaged modules and crew, offering battlefield resilience. Manage these wisely to survive prolonged engagements.
World of Tanks Repair Mechanics
When you roll out onto the battlefield in World of Tanks, your survival depends not only on firepower and strategy but also on your ability to sustain and recover from damage. A well-timed repair can turn the tide of battle, transforming imminent defeat into a heroic victory.
Understanding how repairs work — from automatic crew repairs to emergency consumables — is critical if you want to outlast your opponents and keep your tank operational under pressure. In this guide, we’ll break down everything you need to know about the repair mechanics in World of Tanks, equipping you with practical knowledge for real in-game advantage.
The Basics: How Repairs Work in World of Tanks
Crew-Initiated Repairs
In World of Tanks, your crew doesn’t sit idle when your tank takes damage. The moment a module (like tracks, engine, or turret) gets damaged, your crew automatically starts repairing it. The repair process gradually restores the module’s hit points every second, working to bring it back to operational status.
However, here’s a crucial point: your crew will only repair the module to a “yellow” state — meaning the part remains damaged but functional. For instance, a damaged turret will turn slower, and a wounded engine will offer reduced horsepower, but you’ll still be able to maneuver and fight. Full restoration requires consumables, which we’ll cover later.
The speed at which your crew repairs depends on:
- The specific module hit (some repair faster than others).
- Your crew’s repair skill level. Training your crew in the Repair skill directly speeds up module recovery.
- Equipment and consumables (like the Large Repair Kit) that boost repair speed.
This passive repair system keeps you in the fight longer, especially in prolonged engagements where every second counts.
Understanding the Yellow State
You’ll often notice modules marked in yellow on your damage panel. This indicates that the module is damaged but still operational at reduced efficiency. Every module has specific thresholds:
- Engine in yellow: Half horsepower output.
- Turret in yellow: Slower turret traverse.
- Gun in yellow: Reduced accuracy and dispersion.
Recognizing these impairments helps you adapt your playstyle in real-time. For example, if your engine is damaged, repositioning becomes riskier, and you might need to switch to a defensive posture.
Consumables: Repair Kits and Strategic Use
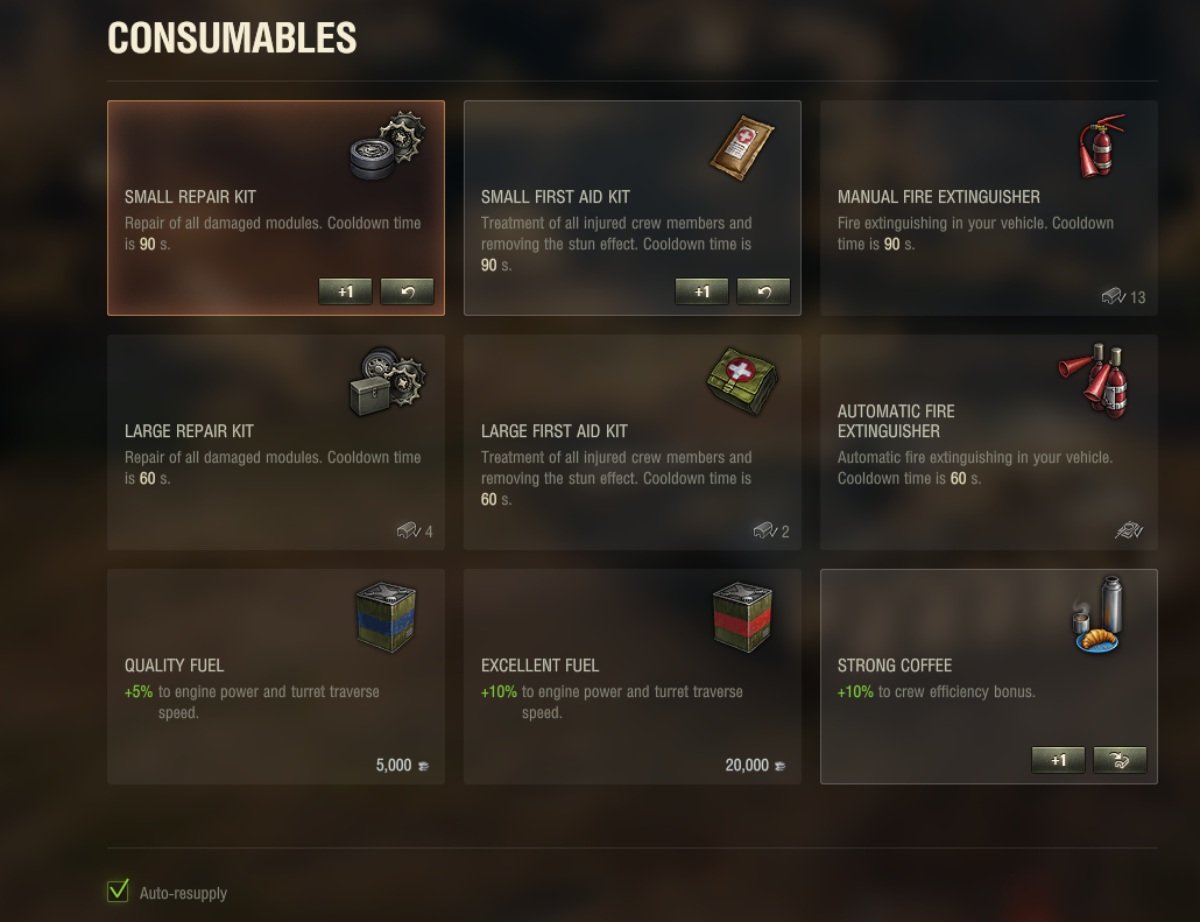
Small Repair Kit
The Small Repair Kit is a one-use consumable purchased with credits. It repairs one selected module during battle. If both tracks are damaged simultaneously (starting from patch 0.7.4), using the kit will repair both at once — an invaluable feature in tight situations.
Pro Tip: Reserve your Small Repair Kit for critical moments, like fixing immobilized tracks when you’re under artillery fire.
Large Repair Kit
The Large Repair Kit is a premium consumable, historically purchased with gold but now also available for credits (since patch 0.8.5). Unlike the small kit, it fully repairs all damaged modules simultaneously and provides a passive 10% bonus to repair speed — even before use.
Strategic use of the Large Repair Kit can save your tank in dire circumstances, especially after receiving concentrated enemy fire that damages multiple components.
Tactical Recommendation:
- Install a Large Repair Kit in battles where module damage is frequent (like city brawls or hull-down positions).
- Use it when multiple systems are compromised to maximize its effectiveness.
Crew Voice Messages: Your Hidden Battle Awareness Tool
Voice messages from your crew are more than just atmospheric — they are vital notifications that keep you informed of your tank’s condition in the heat of battle.
Module Damage Alerts
Whenever your tank suffers module damage, your crew immediately notifies you. Whether it’s a damaged engine or tracks, the voice line helps you react quickly:
- “Our engine is damaged!” signals reduced mobility.
- “Tracks hit!” warns of potential immobilization.
Being responsive to these alerts is crucial. For example, upon hearing a damaged track warning, you might activate your repair kit immediately to avoid becoming an easy target.
Crew Casualty Notifications
Your crew will also alert you if a crew member is injured or killed:
- “The gunner is wounded!” means your accuracy is compromised.
- “Commander is knocked out!” impacts overall tank performance, including view range and radio communication.
Quick reaction is essential here — use medical consumables if available to restore crew effectiveness.
Fire and Critical Damage Warnings
The unmistakable urgency of messages like “We’re on fire!” or “Ammo rack hit!” demands immediate attention. Fires can quickly destroy your tank if left unchecked, and damaged ammo racks severely hinder your rate of fire.
Always keep a fire extinguisher and repair kit ready to respond to these emergencies.
Repair Prioritization: Choosing What to Fix First
When multiple systems fail, knowing what to repair first can save your life.
Priority 1: Tracks (if immobilized under threat)
Being stationary in enemy sights is a death sentence. Repair tracks first to regain mobility.
Priority 2: Gun
If your gun is damaged, your combat effectiveness plummets. Repair it quickly to continue fighting back.
Priority 3: Engine (in prolonged fights)
A damaged engine slows you down, making repositioning difficult. In longer battles, restoring engine power can help you re-engage or retreat effectively.
Priority 4: Ammo Rack
While an ammo rack hit doesn’t stop you from firing, it slows reload speed by 50% and risks catastrophic detonation if hit again. Repair it when safe.
Crew Messages: Emotional Boosters & Tactical Cues
While functional, crew messages also add personality to your tank battles. From confident “Let’s get this show on the road!” at battle start to grim warnings like “We’re done for! Bail out!” when your tank is destroyed, these voice lines immerse you in the experience and give you valuable tactical cues.
Example Situations:
- Auto-aim engaged: “Target acquired!” — Useful when focusing on dodging shells.
- Critical hits: “Critical hit!” — Confirms damage inflicted on vital enemy components.
- Enemy set on fire: “Enemy on fire!” — Celebrate and press the attack.
Knowing these cues improves your situational awareness and helps you anticipate both your condition and enemy vulnerabilities.
Staying Alive: Pro Repair Tips for Victory
- Train your crew: Maximize the Repair skill across your crew for faster module restoration.
- Carry repair kits: Small for emergencies, large for catastrophic damage.
- Listen actively to crew messages: They are your in-battle damage report system.
- React immediately to fire warnings: Fires cause continuous module and crew damage.
- Anticipate module failure: If you’re in a brawling tank, expect frequent track and gun damage. Prepare accordingly.
- Pre-battle checklist: Always load repair kits and check crew skills before rolling out.
Repairs Are Your Second Chance
In World of Tanks, damage is inevitable. But defeat is not.
Mastering repair mechanics gives you a massive edge over less prepared players. Understanding which modules to prioritize, when to use consumables, and how to listen to your crew’s vital cues will turn you from an average tanker into a battlefield survivor.
Every second counts. Make your repairs count even more.
So next time you hear “Track hit!” or “Ammo rack damaged!”, don’t panic — repair, retaliate, and win.
What is Clan Wars?
Clan Wars represents the pinnacle of competitive play in World of Tanks, where organized groups of players — clans — battle across a dynamic global map for dominance, gold, and exclusive rewards. This mode elevates the stakes beyond standard random battles, requiring tight coordination, advanced strategy, and sharp communication between teammates.
Participating in Clan Wars unlocks access to special rewards, including exclusive tanks not available through regular gameplay. These prized vehicles often come with unique features, making them highly sought after by competitive players.
On the Global Map, clans fight for control of provinces, earn gold from their territories, and engage in diplomacy or rivalries with other clans. Success here isn’t just about raw firepower; it demands careful planning, territory management, and shrewd negotiation. A well-executed campaign can secure your clan’s position as a dominant force.
Strong communication is essential. Clan Wars battles involve numerous players and require synchronized attacks, coordinated flanks, and timely retreats. Using tools like Discord or TeamSpeak ensures rapid information flow and precise command execution during combat.
Whether you are a frontline brawler, a strategic commander, or a support player providing crucial information, Clan Wars has a role for you. It offers a deeply rewarding experience, both in terms of personal growth and collective achievement, forging bonds with your clanmates as you battle for supremacy on the world stage.
Winning Team Composition
Victory in World of Tanks, especially in competitive formats like Clan Wars or team battles, depends heavily on well-balanced team composition. Every tank type plays a vital role, and assembling a versatile mix maximizes your team’s effectiveness on the battlefield.
Heavies form the backbone of any composition. With their thick armor and powerful guns, they are perfect for leading assaults and holding critical positions. Their ability to soak up damage and draw enemy fire makes them invaluable in direct confrontations and defensive stands.
Mediums act as the flexible core of the team. These tanks excel at flanking maneuvers, supporting heavies, and reacting swiftly to enemy movements. Thanks to their balanced speed, firepower, and armor, mediums can exploit openings in the enemy line and adapt to changing battle conditions.
Lights provide essential vision control. Scouts locate enemies early, enabling artillery and snipers to target them effectively. A good scout disrupts enemy plans, prevents flanking attacks, and provides crucial battlefield intelligence.
Tank Destroyers (TDs) are the ambush predators of your lineup. Positioned strategically, TDs deal devastating blows to advancing enemies. Their powerful guns make short work of exposed tanks, especially when they remain concealed until the right moment.
SPGs (Artillery) offer indirect fire support, suppressing enemy advances and punishing stationary targets. Artillery players should focus on high-priority targets like clustered enemy groups or entrenched heavies.
Tip: Practice coordinated focus fire and fallback tactics. One fully destroyed enemy tank is better than multiple damaged threats still capable of fighting back.
Communication Wins Battles
- Effective communication is the backbone of successful team play in World of Tanks. Voice chat platforms like Discord or TeamSpeak offer real-time communication, enabling players to share vital battlefield information instantly. Text chat can be helpful, but voice communication significantly speeds up coordination. Using voice chat allows players to alert teammates about enemy positions, call for assistance, or suggest tactical maneuvers on the fly. Quick communication can mean the difference between a coordinated push and a disorganized retreat. Make it a habit to join your team’s voice channel before every battle for better cohesion.
- Assigning a dedicated shot caller is crucial in organized battles, especially in competitive formats like Clan Wars. The shot caller’s role is to direct team movements, prioritize targets, and make tactical decisions under pressure. This centralized command ensures everyone is on the same page, preventing confusion during critical moments. The shot caller calls focus fire targets, orders retreats or advances, and keeps the team aligned with the battle plan. Trusting your shot caller and following their commands promptly increases your team’s efficiency and battlefield control.
- Keep callouts short and clear. In the heat of battle, long explanations waste precious seconds. Use concise terms such as “Enemy heavy tank at D5!” or “Focus fire on IS-7!” to convey information quickly. Short, direct communication helps maintain clarity and ensures that critical details aren’t lost in unnecessary chatter. Practice clear callouts during every game to build strong habits that will serve you well in high-pressure situations.
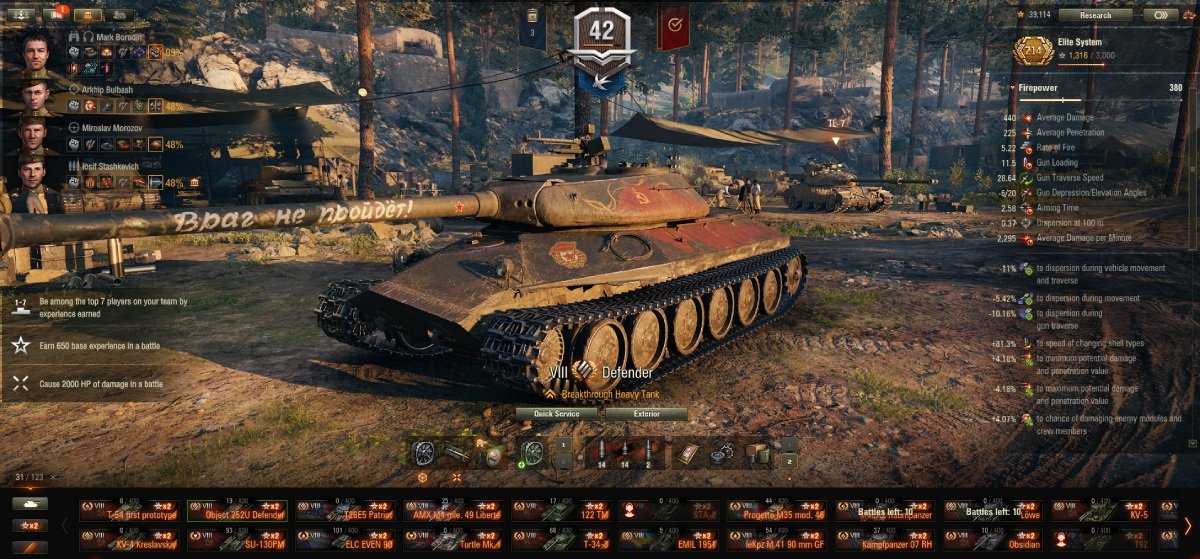
Equipment, Consumables & Crew: Maximize Tank Performance
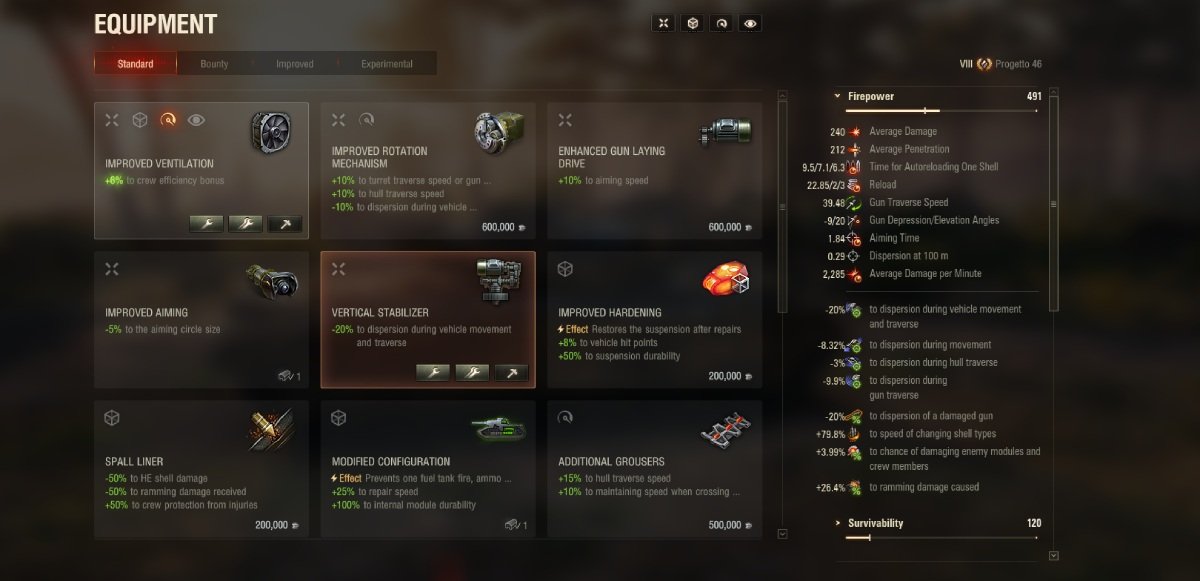
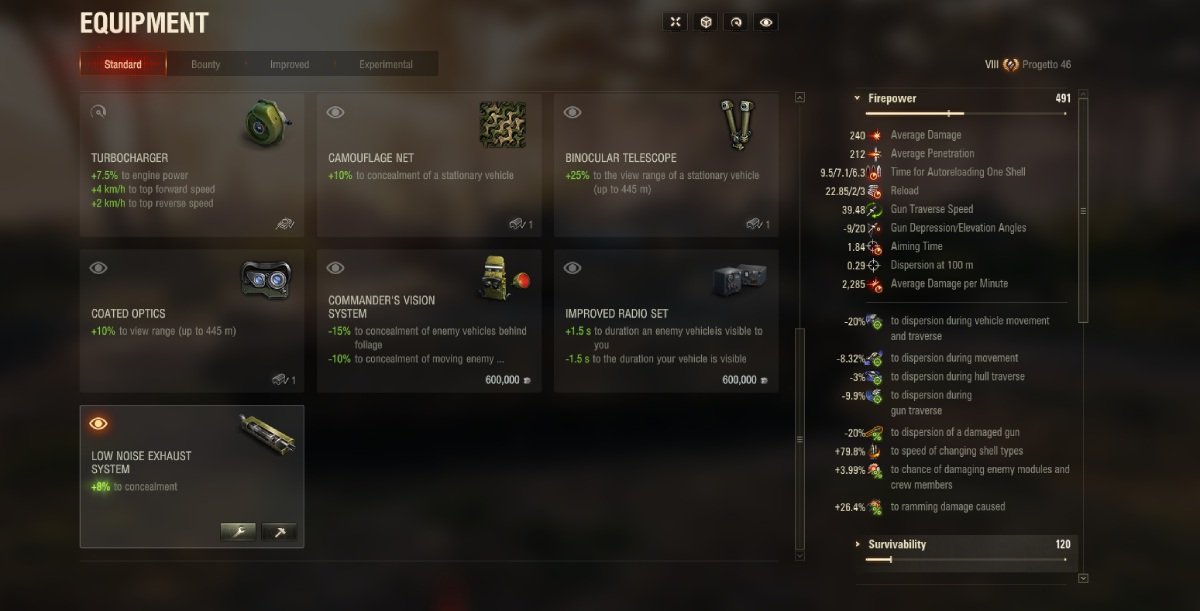
Essential Equipment Choices
- Gun Rammer: Increasing your rate of fire can turn the tide of battle. The Gun Rammer reduces reload times, allowing you to fire more shots over the course of a battle. More shots fired means more potential damage and a higher chance of disabling enemy vehicles. In prolonged engagements, faster reload speed can overwhelm opponents and secure crucial kills before they have time to respond. Equip a Gun Rammer to maximize your damage output in every fight.
- Vents: Improved Ventilation, commonly referred to as Vents, enhances all crew skills by five percent. This seemingly modest boost has a significant impact on your overall performance. Faster aiming, quicker reload times, improved mobility, and better view range all contribute to battlefield dominance. Vents are especially effective when combined with crew skills and consumables, stacking performance benefits across multiple areas. If you aim to get the most out of your tank and crew, Vents are a must-have piece of equipment.
- Optics: Vision is power in World of Tanks. Enhanced Optics increases your view range, enabling you to spot enemies before they spot you. Early detection allows you to position strategically, avoid ambushes, and provide valuable intelligence to your team. For light tanks and mediums fulfilling scouting roles, Optics are essential for maintaining battlefield awareness. Seeing the enemy first gives you a decisive advantage, letting you dictate engagements and support your allies more effectively.
Consumables: Lifesavers in Battle
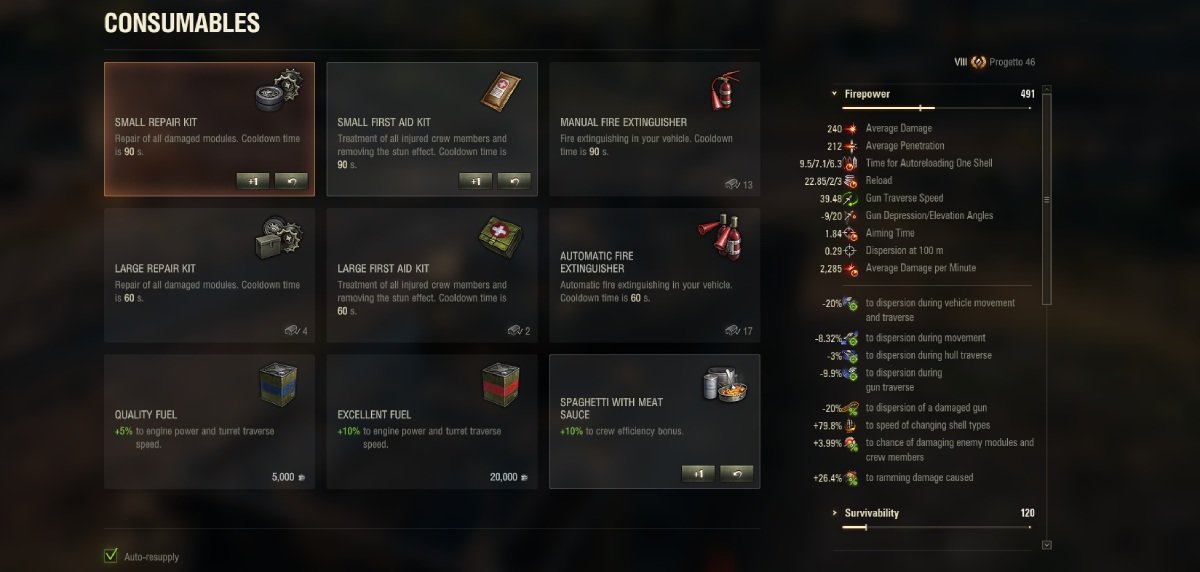
- Automatic Fire Extinguisher: Fires can cripple your tank, destroying modules and draining hit points rapidly. An Automatic Fire Extinguisher activates instantly, minimizing fire damage and increasing your survival chances. Fires are especially dangerous for tanks with front-mounted engines or weak ammunition storage. Equip this consumable to protect yourself from catastrophic damage during critical moments.
- Large Repair Kit: Mobility and firepower are your lifelines in battle. The Large Repair Kit not only fixes all damaged modules but also provides a passive bonus to repair speed for the rest of the battle. Fast repairs can mean the difference between escaping danger or becoming an easy target. Prioritize repairing essential components like your tracks or gun to stay combat-effective and avoid being caught defenseless.
- Chocolate or Coffee: These food consumables provide a ten percent boost to all crew skills for the duration of the battle. Though often overlooked, this bonus enhances virtually every aspect of your tank’s performance, from aiming speed to driving agility. In clutch situations, this slight edge can turn narrow defeats into victories. Use these consumables to push your tank and crew to peak effectiveness.
Pro Insight: Food boosts are underrated. In critical moments, that extra crew performance saves lives.
Crew Skills for Maximum Power
- Sixth Sense: Situational awareness is paramount. Sixth Sense alerts you three seconds after your tank has been spotted, giving you valuable time to take cover or reposition. This skill is a game-changer, particularly for light tanks and tank destroyers that rely on stealth. Knowing when you’ve been detected allows you to react before incoming fire lands, preserving your tank’s health and staying in the fight longer.
- Brothers in Arms: This perk grants a five percent boost to all crew skills when fully trained across the entire crew. Combined with equipment like Vents and consumables such as Chocolate or Coffee, Brothers in Arms compounds performance bonuses to maximize your tank’s capabilities. It benefits every crew role, improving everything from reload times to camouflage effectiveness. Invest in this skill early to enhance your overall combat efficiency.
- Repair: Keeping your tank mobile and operational is critical. The Repair skill speeds up the recovery of damaged modules, particularly tracks and turrets. A disabled tank is an easy target, but a fast repair can get you moving and back in cover before enemies capitalize on your vulnerability. Prioritize training Repair on crew members to maintain battlefield mobility and avoid becoming an immobile target.
My secret? Use crew books to train fast, and move trained crews into premium tanks for credit grinding.
Final Conclusion: Commanders Win with Knowledge, Not Just Firepower
Victory in World of Tanks isn’t just about firepower — it’s about mastery of every hidden mechanic that defines the battlefield. From base capture tactics to visibility systems, from precision aiming to module repair, success is earned by those who understand the game beneath the armor.
When you capture bases smartly, you seize control over the pace of battle, forcing opponents into mistakes and claiming victory even when brute force falls short. Visibility is your silent weapon — spot enemies first, position for advantage, and avoid ambushes before they happen. Commanders who control vision control the battle.
Mastering mobility and radio communication ensures you’re never out of position or out of touch. Light tanks use speed to scout and relay targets, mediums maneuver flexibly, heavies anchor key positions, and artillery supports from the rear. Every role matters, and movement keeps you alive.
Aiming accuracy is your precision edge. Understanding auto-aim limits, manual aiming, shell trajectories, and dispersion turns you into a sniper of steel, consistently outgunning your rivals.
Know your penetration mechanics — angles, shell types, RNG, and overmatch rules dictate whether your shots deal damage or bounce harmlessly away. And once you penetrate, understanding damage mechanics lets you cripple enemy tanks, setting fires, wrecking modules, and swinging engagements in your favor.
Finally, never underestimate repair systems. Quick thinking with repair kits, trained crews, and instant reactions to crew alerts can turn certain defeat into defiant victory.
Commanders, your path to triumph is clear: move smart, see first, shoot true, survive longer, and always play with purpose. Victory belongs to those who understand not just the battlefield, but the game behind the battle.
Now, roll out and claim your win!


