 Skip to content
 Landing shots in World of Tanks isn’t just about pointing and clicking—it’s about precision, patience, and a deep understanding of game mechanics. Many new players believe aiming is straightforward: center the reticle, pull the trigger, and boom—you score a hit. But that mindset leads to frustration when shots consistently miss, bounce off armor, or land somewhere completely unexpected. The truth? WoT’s aiming system is a nuanced beast. From reticle bloom and shell dispersion to turret movement, armor angling, and the hidden influence of crew skills and consumables—every element plays a role. Whether you’re in a hulking heavy or a nimble light, knowing when to shoot, where to aim, and how to read the armor profile can make the difference between a win and a waste of credits. This guide strips away the guesswork. You’ll learn how to aim smarter, adjust to battlefield conditions, and finally understand why that “sure thing” shot went wide. It’s time to stop guessing and start landing shots that matter.
TL;DR
- Manual aiming is superior for hitting weak spots, while auto-aim has limited uses.
- Wait for full aim to reduce dispersion and boost accuracy.
- Know your shell types: AP, HE, and HEAT each behave differently on impact.
- Understand your tank class: each demands a different approach to aiming.
- Practice in Training Rooms and review replays to master techniques.
Understanding the Aiming Reticle
What the Reticle Actually Shows
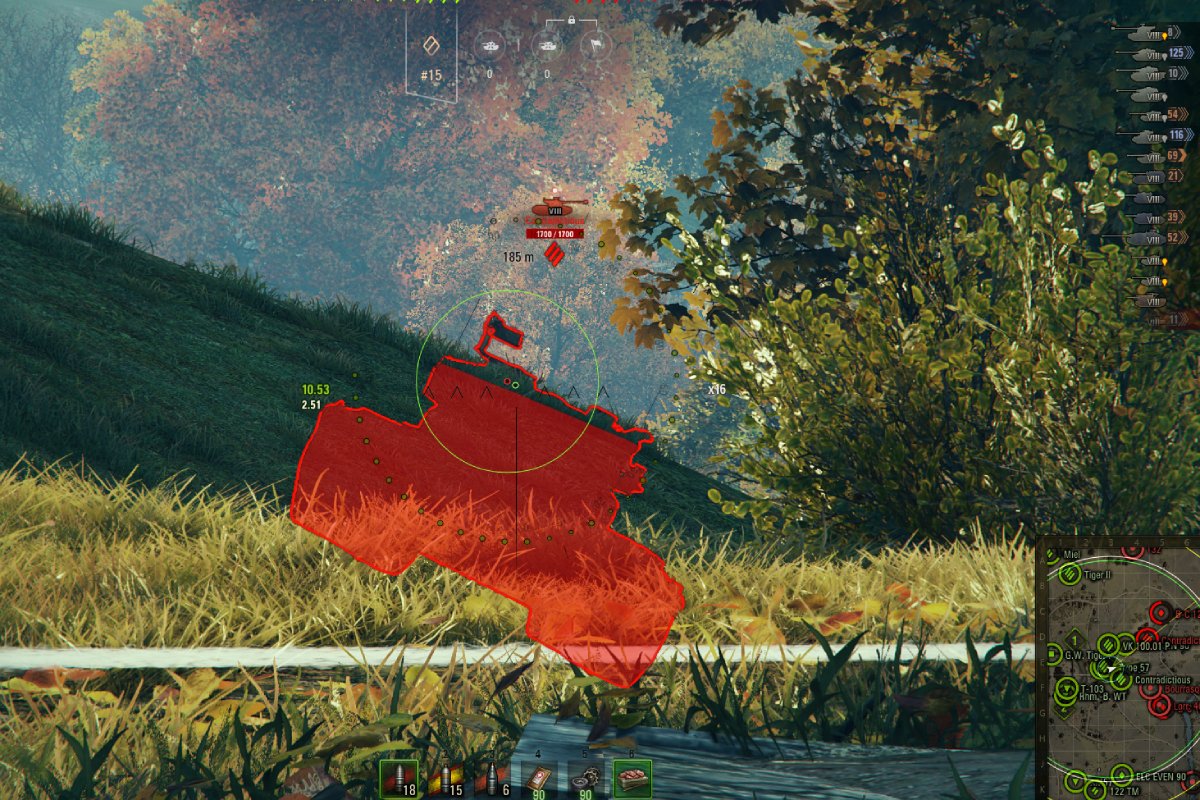
The aiming circle in World of Tanks represents a probability zone, not a precision laser. New players often confuse the reticle with a direct line of fire, expecting every shot to land squarely in the center. However, the reticle actually displays a dispersion circle—a randomized zone within which your shell can fall. The size of this circle fluctuates based on factors like tank movement, turret rotation, firing, and equipment. Even when fully aimed, shots can deviate within the circle. This randomness is what makes the aiming mechanic so nuanced. Accuracy is not just about centering the enemy, but about knowing when the reticle is small enough to guarantee a reliable shot. Learning how to manage this circle, anticipate dispersion behavior, and patiently aim will drastically improve your hit percentage. Use stationary positions, lock your hull when possible, and always let the reticle fully shrink unless time is critical. Never rely on it blindly—read the situation and adapt accordingly.
Dispersion Explained
Dispersion is your tank’s built-in gun inaccuracy, and it’s calculated in meters at a 100-meter distance. A gun with a 0.35m dispersion stat means your shot could land anywhere within a 0.35-meter radius from the center of the reticle at 100 meters. The further the shot, the more room there is for error. But that’s only half the story. Every movement you make—be it rotating the turret, driving over rough terrain, or just reversing—affects how much that aiming circle blooms. Some tanks, like Russian heavies, have poor dispersion during movement but can land devastating shots when fully aimed. Others, like premium Swedish TDs, are designed for firing on the move with minimal bloom. Understanding the dispersion mechanics of your specific vehicle allows you to adapt your playstyle. Don’t underestimate this stat—combine it with equipment like vertical stabilizers or improved aiming units to tighten that circle and get more consistent hits.
Auto-Aim: Useful Tool or Bad Habit?
When Auto-Aim Works
Auto-aim, also known as server-side lock, is a tool that has very specific use cases in World of Tanks. When you’re in a fast light tank or medium and need to keep your mobility while shooting, auto-aim allows you to stay evasive while maintaining pressure. It’s ideal for circle-strafing slower tanks, hit-and-run tactics, or focusing on mobility while keeping a shell ready. Auto-aim locks onto the enemy’s center mass, meaning it can consistently hit moving enemies—if you’re close enough. It shines when manual aiming would force you to slow down or miss a crucial window of opportunity. That said, it’s a tool—not a crutch. Using it effectively involves knowing when it benefits your positioning more than your precision. Combine auto-aim with mobility, not static fights. Learn to toggle it quickly in the heat of battle, especially when you’re multitasking dodges and reloads.
When to Avoid It
Auto-aim is not a substitute for skillful targeting. Its biggest flaw is that it completely ignores armor thickness, slope, and weak spot placement. It always aims at the geometric center of the target, which is often the most heavily armored part of a tank. This is a recipe for bounces, especially against opponents using hull-down tactics or side-scraping. Auto-aiming a hull-down IS-7? You’re just bouncing shells off its turret cheeks. When sniping or engaging in long-range firefights, manually aim at known weak spots like the cupola or lower glacis. If your target is angling, auto-aim becomes even worse—shots will hit at ineffective angles. Players who over-rely on it end up frustrated by missed opportunities. Ditch auto-aim in technical fights. Use it only when movement trumps precision. The key takeaway: auto-aim is for mobility-based aggression, not precision shooting.
Shell Type Matters—A Lot
Armor-Piercing (AP)
Armor-Piercing shells are the standard ammunition in World of Tanks and the go-to round for many tanks. They have a useful mechanic called normalization, which slightly reduces the angle at which the shell hits the armor—meaning better chances of penetration against angled plates. AP is most effective at medium range, where accuracy and penetration balance out. It’s reliable when targeting flat surfaces or slightly angled armor. That said, AP struggles when hitting highly sloped areas like the sides of Soviet heavy tanks or the upper glacis of certain TDs. If you’re aiming AP, go for weak spots: lower plates, side panels, and rear armor. Be wary when shooting tracks, as AP shells often get absorbed. Understanding when to rely on AP involves knowing enemy armor layouts and reading the angle of attack. When in doubt—switch to premium ammo if the armor looks too tough.
High-Explosive Anti-Tank (HEAT)
HEAT rounds are powerful but unforgiving. They do not normalize like AP, and their angle of impact determines whether they penetrate or not. A shallow impact angle? It’s likely to bounce. HEAT also performs poorly against spaced armor, tracks, and angled surfaces. This makes it risky in urban close-quarters combat or when engaging tanks with side skirts. However, HEAT boasts higher raw penetration than standard AP in many tanks, making it deadly when aimed correctly at flat surfaces. Always aim for the lower glacis, turret rings, or rear if you’re using HEAT. Never shoot at spaced armor like the sides of Super Heavies or the spaced tracks of American TDs. Knowing when to load HEAT is part of becoming a strategic player—it’s not a fire-and-forget shell.
High-Explosive (HE)
High-Explosive shells bring splash damage to the table, which makes them unique. While they rarely penetrate armor, they can damage external components and unarmored modules like tracks, hatches, and the engine deck. HE is perfect for resetting base captures, finishing off low-health opponents hiding behind cover, or dealing module and crew damage. Some tanks, like the FV4005 or KV-2, are built around their HE capabilities. To maximize damage, aim at thin armor areas or external modules—shooting the side of a lightly armored SPG or LT can yield massive results. However, be cautious with HE against well-armored targets. It may result in zero-damage hits or minimal impact. Effective HE use comes down to target knowledge, positioning, and a bit of risk calculation.
Aiming by Tank Class
Light Tanks
Light tanks aren’t designed for precision fire—they’re scouts, flankers, and passive spotters. That said, when they do shoot, the context and technique matter more than raw firepower. Because light tanks often move at high speeds, their reticle bloom is extreme. Auto-aim is a helpful crutch in motion, but when you stop to take a shot—especially from behind or the side of an enemy tank—manual aim becomes essential. Know your gun handling; some lights like the T49 or ELC EVEN 90 are wildly inaccurate, while others like the AMX 13 90 can be surprisingly reliable if fully aimed. A key technique is drive-by shooting: line up your shot before moving out of cover, auto-aim, then fire as you pass and duck back. Don’t waste time aiming at the front of heavy tanks—you won’t pen. Wait for your moment, go for sides and rear armor, and conserve ammo for shots that matter.
Medium Tanks
Medium tanks are the all-rounders of World of Tanks, which makes them great for teaching and testing aiming mechanics. With decent mobility and competitive gun handling, mediums excel at peek-a-boom tactics and mid-range engagements. The best medium players know how to read weak spot exposure and balance aim time with exposure time. For example, popping over a ridge for just a second? Pre-aim the shot where the enemy is likely to appear. Many mediums have fast aim times and low dispersion penalties, meaning you can snap quick shots and reposition. But don’t get cocky—manual aiming is still crucial for exploiting weak spots like turret rings, hatches, and underbellies. If your target is angling, try baiting a shot to break their position before punishing with a clean, aimed return shot. With their versatility, mediums give you room to experiment, but mastering aim technique in this class translates well to others too.
Heavy Tanks
Heavy tanks trade mobility for armor and firepower, so every shot you take has to count. Your reloads are long, your movement is slow, and missing a shot can cost you both health and position. This makes precise aiming absolutely critical. Fully aim your shots unless you’re under imminent threat—rushed shots from heavies tend to miss, bounce, or hit spaced armor. Pre-aim corners where you expect enemies to appear, especially in corridor maps. When facing another heavy, avoid shooting upper plates or turrets; wait for a misstep or expose their lower glacis. Equipment like a Gun Laying Drive or Improved Aiming Unit is vital to help your reticle shrink faster. Also, use terrain to angle your hull while you aim—this keeps you protected while waiting for that perfect shot opportunity. Aim smart, conserve HP, and make every shell a statement.
Tank Destroyers
Tank Destroyers (TDs) are the kings of precision. With high-velocity shells and pinpoint accuracy, they’re built for distance engagements where every pixel matters. Most TDs don’t have turrets, so you must align your hull carefully before aiming. Manual aiming is mandatory—auto-aim in a TD is almost always a waste. The best TD players memorize armor layouts and target weak spots like lower plates, turret rings, and cupolas. Zoom in fully, track enemy movement, and don’t shoot until your reticle is fully settled. Some TDs, like the Grille 15 or Strv 103B, boast laser-like accuracy and can hit moving targets at 400+ meters. Use bush cover and the camouflage system to fire without being spotted, then relocate. One missed shot from a TD can be the difference between deleting a scout or letting them light up your backline. Practice patience, stay hidden, and aim with sniper-level discipline.
Common Aiming Mistakes
What Most Players Get Wrong
Aiming in World of Tanks isn’t just a mechanical skill—it’s also about decision-making. Unfortunately, many players fall into patterns that reduce their effectiveness in battle. One of the most common mistakes is firing before the aiming reticle has fully shrunk. This is especially painful in tanks with long reload times or poor gun handling; a missed shot here doesn’t just cost damage—it can lose your position or get you killed. Another big offender is misunderstanding armor profiles. Just because you hit a tank doesn’t mean you’ll deal damage. If you don’t account for angling, slope, or the location of spaced armor, your shot might bounce or get absorbed. A third issue? Using the wrong shell type. Firing HEAT into spaced armor or HE into a thick front plate will lead to nothing but frustration. And lastly, players often fire while moving without the equipment or crew skills to support it—turning their firepower into glorified warning shots. Aiming is situational. Know your tank, understand your enemy, and time your shots with intention. One well-placed round is worth far more than three missed ones.
Advanced Targeting: Weak Spots and Pen Indicators
The Color Code System
World of Tanks gives you real-time targeting feedback through its color-coded penetration indicator system. When you aim at an enemy tank, your reticle will change color based on your shell’s chance to penetrate. Green means likely to pen, orange indicates uncertain penetration, and red means the shot will likely bounce. While many players use this as a visual cue to fire or not, experienced tankers take it further—using the indicator to scan a tank’s entire profile. Instead of settling for an orange lower plate, why not check the turret ring or the roof? The color guide helps you avoid wasting shells but only works if you learn how to “paint” a tank with your reticle. It’s a real-time weak spot detector if you use it smartly.
Where to Aim for Results
Knowing where to aim is more important than simply aiming fast. Common weak spots include the commander’s cupola, lower glacis plate, turret ring, and the thin side and rear armor just behind the tracks. These areas generally offer a better chance at penetration—even against heavily armored tanks. Some SPGs and LTs have weak upper hulls and can be punished with HE. Memorize the layouts of popular tanks like the Maus, IS-7, or E100. Over time, you’ll know where to shoot instinctively. And if you want a shortcut? Legal mods like Aslain’s can overlay armor profiles to highlight weaknesses. Just make sure you’re hitting armor and not external modules like spaced plates or track guards. Great aiming isn’t just mechanical—it’s anatomical. Learn the tank bodies, and you’ll land punishing shots every time.
Practice Like a Pro
Training Room Drills
Practice doesn’t just make perfect—it makes permanent. Training rooms are one of the most underrated tools in World of Tanks. You can create a controlled environment where the stakes are zero and learning is the goal. Want to master leading shots? Set up a bot or a friend driving laterally at medium range. Want to get better at aiming while moving? Use a fast tank and practice peeking ridges. You can rehearse shooting over distance, timing your aim circle, or testing out different shell types. One great drill is the “snapshot test”—line up an enemy, zoom in, and see how fast you can shrink your reticle and fire accurately. Adjust your equipment between sessions and measure the impact. It’s the closest thing WoT has to a shooting range. If you’re serious about improvement, 30 minutes in the training room is worth more than 10 random battles. Record your sessions, review your patterns, and apply those lessons to real matches.
Replay Analysis and Stream Sniping for Learning
Another high-impact method for improving your aim is studying others—especially yourself. The in-game replay system lets you watch every battle with full camera control. Missed a shot? Scrub back and analyze your aim point. Did you overexpose before aiming? Did you rush your reticle? By reviewing your own mistakes, you create feedback loops that AI aim trainers simply can’t replicate. Also, watching top streamers like QuickyBaby or Skill4ltu can accelerate your learning curve. Focus not just on where they aim—but when they choose to shoot, how they respond to enemy movement, and what shell types they load. Don’t just passively watch—pause, rewind, and take notes. Some players even load replays into external viewers like WoT Inspector for deeper breakdowns. Aim training isn’t glamorous, but if you treat the game like a sport, this is your post-game film session. The better you understand your own bad habits, the faster you can replace them with good ones.
Crew and Equipment: The Invisible Hand Behind Aiming
Skills That Sharpen Your Shot
Your crew isn’t just background noise—they directly affect how tight your aiming circle gets and how fast it shrinks. The Snapshot skill on your gunner helps reduce dispersion when turning your turret, which is crucial for tanks that pivot quickly in brawls. Smooth Ride on your driver reduces reticle bloom while driving forward, especially useful for medium tanks and fast heavies. Then there’s Brothers in Arms, a perk that buffs all crew members’ stats across the board when trained by everyone in the tank. It doesn’t just speed up reload—it improves aim time, handling, and even view range. You’ll also benefit from Situational Awareness and Recon to help spot targets earlier, giving you more time to aim. High-skill crews are the hidden edge in WoT—many shots you miss with a 75% crew land clean with a 100% BiA-trained team. If you want to consistently hit weak spots, your crew is just as important as your gun.
Best Equipment for Aim Mastery
Equipment in World of Tanks directly affects how your gun handles. The holy trinity for better aiming includes the Vertical Stabilizer, Gun Laying Drive, and Improved Aiming Unit. The Vertical Stabilizer reduces dispersion during movement and turret traverse, making it ideal for tanks that can’t sit still. Gun Laying Drive shortens the time it takes for your reticle to shrink fully, helping tanks with long aim times become more responsive. Improved Aiming Unit tightens your overall reticle size—great for tanks with good base accuracy that you want to push even further. If you’re driving a turretless TD, ditch the VStab and use Binocs or a Turbocharger depending on the role. Don’t ignore bounty or improved versions of this gear either—they add that extra edge in competitive matches. Your choice of equipment should complement your tank’s natural strengths and shore up its weaknesses. Aim better, aim faster, and you’ll win more fights—that’s the simple math.
Conclusion
Aiming in World of Tanks isn’t something you master overnight. It’s a layered skill that blends knowledge, experience, and execution. From reticle mechanics to dispersion values, crew perks to shell choice, every detail shapes the shot you take. Understanding weak spots, anticipating armor angling, and adjusting for distance all come into play. Precision requires patience, and consistency demands practice. Whether you’re flanking with a light, holding a corner in a heavy, or sniping in a TD, the difference between landing or missing often comes down to a split-second decision and your preparation before that match. Players who treat aiming as a skill—who study, adapt, and train—consistently outperform those who rely on instinct alone. So don’t just play to survive—play to sharpen your shots. Because at the end of the day, the battlefield doesn’t reward spam. It rewards accuracy. And in World of Tanks, one well-aimed shot can change everything.


