 Skip to content
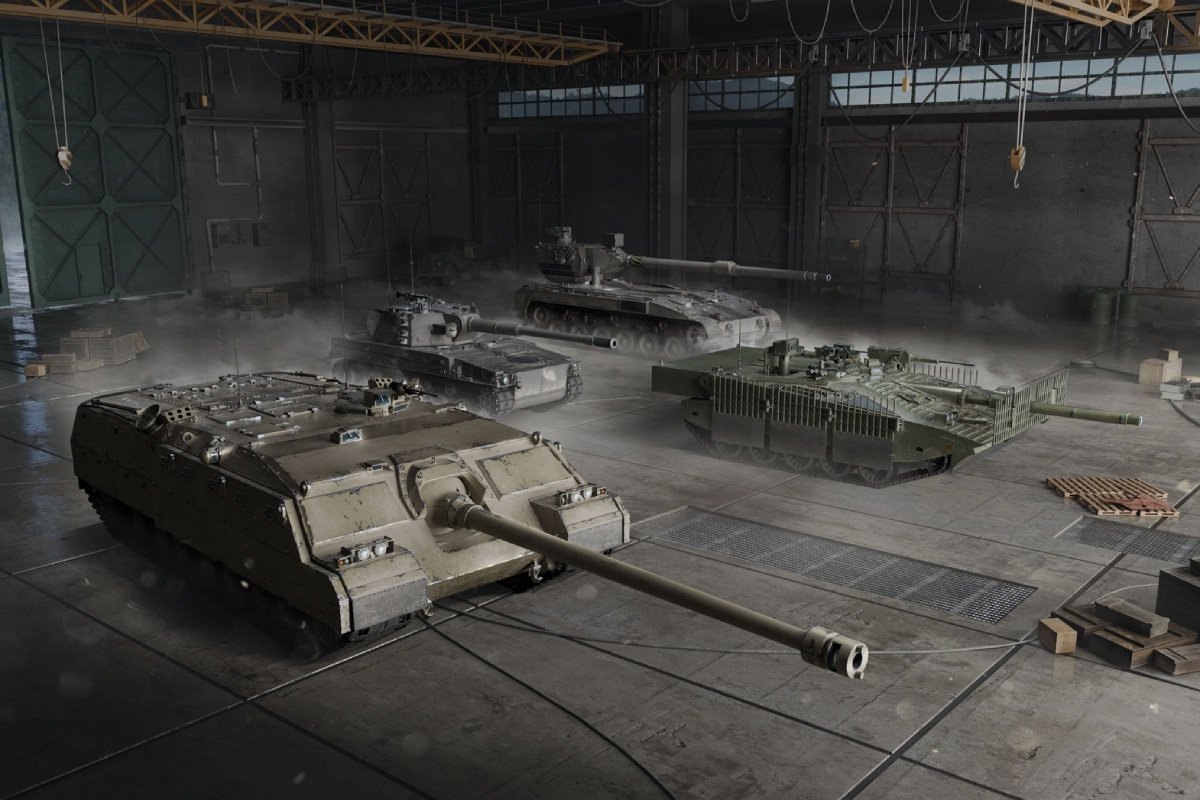
 Tank destroyers have always been the lurking menace of World of Tanks—silent hunters capable of dictating battles with a single well-timed shot. But with Update 2.0, Wargaming has raised the stakes by extending the tech tree into Tier XI. Enter the new generation of destroyers: the German Hirschkäfer, the Swedish Strv 107-12, and the British AT-FV230 Breaker. These aren’t simple stat upgrades; each introduces unique mechanics that twist, challenge, and sometimes completely reinvent traditional TD gameplay.
Veteran players have grown accustomed to Tank Destroyers as static glass cannons or trench-diggers, and the meta risks going stale if Tier XI just adds inflated numbers. Players feared Tier XI might collapse balance—ammo-rack RNG, immobile bunkers, or unstoppable armored pushes. Each of these TDs delivers sharp tradeoffs: guaranteed lethality, immovable precision, or brute-force armor—all balanced by deliberate weaknesses and counterplay. The result is a high-risk, high-reward evolution of the class that demands more from commanders than ever before.
TL;DR
- Three new Tier XI tech-tree TDs redefine endgame play: Hirschkäfer (Germany), Strv 107-12 (Sweden), and AT-FV230 Breaker (UK).
- Each introduces a unique mechanic: Preheat System (accuracy & ammo-rack kills), Pillbox Mode (fortified precision), Direct Drive (momentum-based mobility).
- All three come with brutal tradeoffs—paper armor, immobility, or map dependence—that keep them from power-creeping Tier X.
- For disciplined players, these vehicles offer deterministic, skill-based rewards unlike anything in previous tiers.
Node by Node: Evolving Tier XI Tank Destroyers
Tier XI introduces a completely reworked progression system that replaces the old Field Modifications with a new linear Node-based upgrade path. Instead of trade-offs where players had to choose between one stat or another, the Tier XI design focuses on continuous improvement. Each unlocked node adds measurable enhancements—better reload, faster traverse, improved gun handling—without forcing sacrifices. For tank destroyers, this shift is huge: it transforms each vehicle into a more specialized predator as you grind through its upgrade tree.
The structure is simple but layered. Every tank destroyer begins at a base configuration. As you battle and earn stars, you unlock nodes in a modular sequence. Some nodes give classic stat bumps like dispersion or HP. Others unlock improvements directly tied to the tank’s unique Tier XI mechanic:
- Hirschkäfer: Node branches can expand traverse arcs, trim aim time, or reduce the speed penalty for building its Preheat System. This means you spend less time sitting completely still to charge your lethal “rack shot.”
- Strv 107-12: Upgrades cut Pillbox reloads and dispersion even further, letting you shred targets with terrifying precision. Higher-tier nodes even widen gun arcs in Pillbox mode, reducing the number of times you have to un-siege and reposition.
- AT-FV230 Breaker: Progression nodes smooth out acceleration and refine reload/aim stats, stabilizing performance in stop-and-go maps. At higher unlocks, the tank ramps into Direct Drive more efficiently, making its forward momentum mechanic easier to exploit.
Unlike Field Mods, which were notorious for their “pick one, lose one” logic, the Node system is designed as a skill curve. It prevents Tier XI TDs from being fully oppressive at stock values while still rewarding players who commit to mastering them. By the time you’ve unlocked the late-stage nodes, your destroyer feels like the fully realized version of its intended role—surgical finisher, lane-locking pillbox, or armored battering ram.
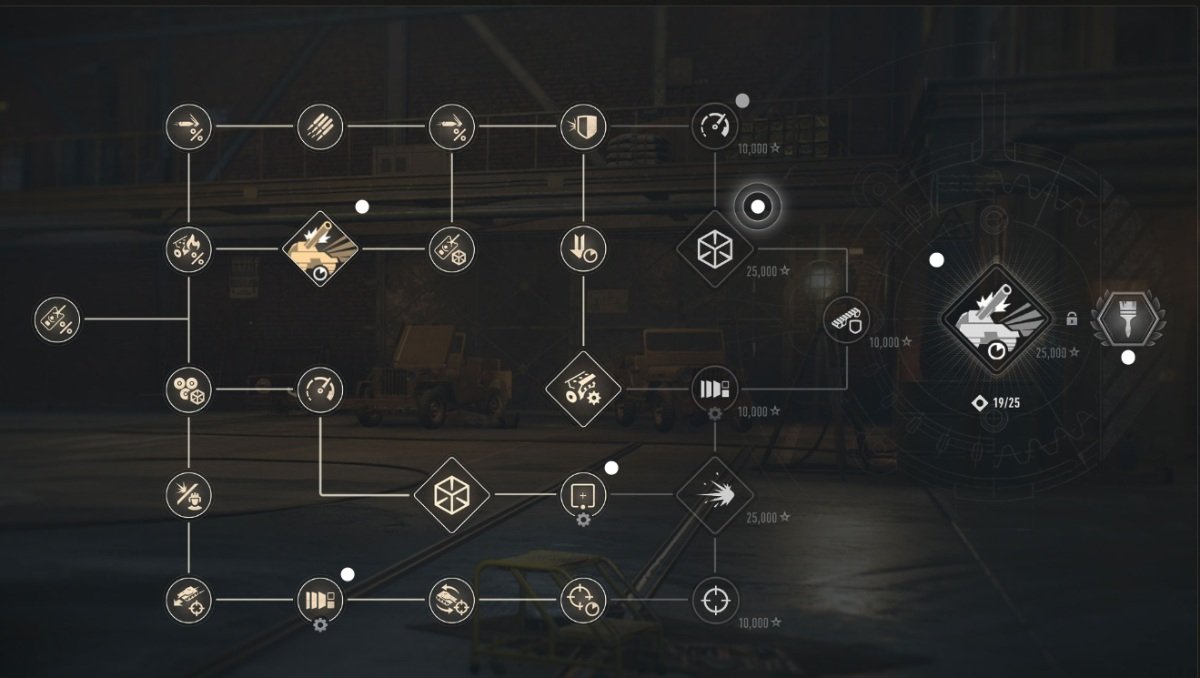
Key takeaway: This progression system keeps Tier XI balanced in matchmaking. A fresh Hirschkäfer or Strv 107-12 isn’t instantly overwhelming; instead, the grind doles out power in increments. That ensures battles remain competitive while still giving dedicated TD mains a clear reward arc for investing time and effort.
Tier XI Destroyers in the Tech Tree
Update 2.0 broke a decade-long ceiling by extending tech-tree lines past Tier X. For tank destroyers, that meant direct successors to iconic vehicles:
- Germany: Hirschkäfer succeeds the Grille 15.
- Sweden: Strv 107-12 follows the Strv 103B.
- United Kingdom: AT-FV230 Breaker continues from the FV217 Badger.
They slot into existing national branches, not as premiums or alternatives, but as core progressions. And unlike Field Mods at lower tiers, Tier XI replaces them with a linear Upgrades Node system—stat improvements and mechanic enhancements unlocked step by step. That means players grind their way into these tanks’ peak states, rather than instantly unlocking max potential.
Hirschkäfer — Tier XI German Tank Destroyer
The German Hirschkäfer takes the sniper archetype and injects it with surgical lethality. Its Preheat System charges whenever the tank remains stationary or creeps under 20 km/h. Fully charged, the next shot gains superior accuracy, higher effective alpha, and—most controversially—a guaranteed ammo-rack detonation if the penetrated target’s HP is below its average damage (550). Translation: when the conditions line up, low-HP targets don’t just “probably” die; they’re removed.
Hirschkäfer Stats & Playstyle
| Nation | Germany |
| Type | Tank Destroyer (Sniper) |
| Tier | XI |
| Successor to | Grille 15 |
| Unique Mechanic | Preheat System — Stay stationary or < 20 km/h to charge a buff that boosts next-shot accuracy & alpha. At max charge, a penetrating hit on a target with fewer HP than your average damage causes a guaranteed ammo rack detonation. |
| Firepower | |
| Average Damage (per shot) | AP: 550 | APCR: 550 | HE: 660 |
| Average Penetration (mm) | AP: 290 → 295 | APCR: 340 → 345 | HE: 60 |
| Dispersion at 100 m | 0.28 → 0.27 m |
| Aiming Time | 1.4 s |
| Gun Reload Time | 13.1 s |
| Ammunition | 40 → 50 shells |
| Gun Depression / Elevation | −7° → −8° / +15° → +17° |
| Gun Traverse Limits | −55° → −57° / +55° → +57° |
| Survivability | |
| Hit Points | 1,900 → 1,950 |
| Hull Armor (front / sides / rear) | 30 / 20 / 20 mm |
| Turret Armor (front / sides / rear) | 30 / 20 / 20 mm |
| Mobility | |
| Engine Power | 830 → 880 hp |
| Specific Power | 20.8 → 22 hp/t |
| Traverse Speed (Hull) | 26 → 28 °/s |
| Turret Traverse Speed | 20 → 22 °/s |
| Top Speed / Reverse | 60 / 15 km/h |
| Spotting & Camouflage | |
| View Range | 380 m |
| Concealment — Moving (%) | 6.78 / 0.95 |
| Concealment — Stationary (%) | 11.34 / 1.59 |
Insider tip: In late-game duels, watch enemy HP bars. Any heavy under ~550 HP is a one-shot kill if you’ve preheated. Good Hirschkäfer players will ping targets to set up these “checkmate shots.”
- Role in the roster: Precision executioner. You’re not trading; you’re ending turns. Think chess: you don’t chase openings—you punish blunders with a forced mate.
- Preheat rhythm: Park, preheat to full, breathe, then fire. If you need to move, feather the throttle under 20 km/h to preserve the charge while micro-adjusting your angle. Snap turns and long sprints reset the payoff—don’t do it unless survival demands it.
- Shot selection logic:
- Primary targets: anything < 550 HP that you can reliably pen. Think wounded heavies peeking, tracked meds, distracted TDs.
- Secondary targets: full-HP opponents offering farm shots where preheat still nets tighter groups and higher damage. You won’t delete them, but you’ll chunk with minimal aim time.
- Avoid: thick angles and spaced armor that can soak or shatter your pen check—your rack clause only triggers on a clean penetration.
- Positioning templates (high-yield spots):
- Open maps (Malinovka/Prokhorovka): second-line ridges with hard cover. Park in bush stacks you can re-leaf without crossing 20 km/h. Preheat while scouts light the crossing; cash out on wounded stragglers.
- Mixed maps (Redshire/Karelia): off-angles that see common rotates. Don’t spawn-snipe for five minutes—rotate once early, then commit to a lane and preheat.
- Urban maps (Himmelsdorf/Ruinberg): anchor long streets, not corners. Corners force bursts of movement; long lanes let you hold 0–15 km/h micro-shifts and keep the charge.
- Ammo discipline: AP for most shots (290–295 mm pen) keeps cost and normalization sane. APCR (340–345 mm) when you must guarantee the pen for a rack kill or against sharply angled armor. HE is niche—use only for paper TDs/arty where a splash finish beats a risky pen check.
- Vision & concealment: You’re thin-skinned; treat camo as HP. Stack camo net + bush layering. Time your shot so bushes stay double-thick (15m rule) and you remain unlit even after firing.
Strengths
- Guaranteed ammo-rack on preheated, low-HP pens.
Why it matters: Endgame math flips. If an E 100 sits at 520 HP and shows a pennable plate, you don’t “try” to finish—you execute. This pressure warps enemy peeks and forces panic rotations. It also turns coordinated focus fire into checkmates: allies grind a target to ≤550, you close the book. - Laser-like precision after charging.
Practical payoff: With preheat active and base dispersion already tight (0.28 → 0.27), you can take micro-exposure shots others pass up. Low aim time (≈1.4 s) means your window to punish is wider, especially against ridge jiggles and turret wiggles. - Strong DPM for a sniper role.
How to exploit: Don’t tunnel on rack conditions. Between 13.1 s reloads you can still 2-shot many Tier IX mediums and cripple Tier X LTs. If the lobby offers farm, take it; your finisher clause is the dessert, not every course.
Weaknesses
- Armor is paper-thin—30 mm across the hull.
Implication: Overmatch, HE, and arty ruin your day. You’re a “no-mistake” platform; once lit in the open, your lifespan is measured in seconds, not clips. - Forced immobility to charge preheat creates predictability.
Counter-pressure: Good enemies will probe, blind-fire, or HE splash bushes to force you to move and dump your charge. If you feel the squeeze, relocate before they commit artillery or yolo lights. - Relocation resets the buff, punishing aggressive repositioning.
Map tax: Some flanks just don’t give you workable arcs. Commit early to lanes that promise long-term sightlines; constant lane-hopping is a self-nerf.
Best Equipment & Consumables for Hirschkäfer
- Improved Aiming Unit — compounds the preheat benefit; smaller reticle = more green shots at distance.
- Gun Rammer — keeps the pressure high between execution shots; the rack clause is great, but throughput still wins games.
- Camouflage Net / Low-Noise Exhaust — pick based on map pool and crew. Net for static lanes; Exhaust if you rely on passive play and frequent bush swaps.
- Optics (swap-in option): valuable if you often solo and need to self-spot late; otherwise trust your lights/meds and double-down on concealment.
- Consumables: Large Repair, Large Med, Food (or Lend-Lease Oil equivalent) if credits allow; food meaningfully tightens gun handling windows. If credits are tight, standard rations are fine—prioritize repair kit uptime.
Crew Skills & Directives
- Commander: Sixth Sense → Recon → Situational Awareness → Eagle Eye (for weak-spot/rack reads).
- Gunner: Snap Shot → Deadeye → Designated Target (sticky lit window helps confirm safe pens).
- Driver: Smooth Ride → Clutch Braking → Off-Road Driving (for under-20 km/h micro-adjusts).
- Loader: Safe Stowage (irony acknowledged) → Adrenaline Rush → Intuition (for AP↔APCR rack setups).
- Directive: Increased Focus (better view retention) or Polished Lens if you run Optics; Vent Purge if using Vents instead of Exhaust/Net.
Preheat Micro-Tech: Keeping the Charge Without Camping
- Feather drift: rotate hull ≤10° and creep at 5–15 km/h to re-center angles without losing charge. Practice in Training Room to learn the threshold feel.
- Double-bush resets: after firing, reverse 15 m to re-opacify foliage, stop, and re-preheat. Don’t instantly re-peek—your rack shot needs both concealment and time.
- Timer discipline: mentally count to your comfort preheat (e.g., 3–4 seconds for “good enough” on mid-range shots, full charge for finisher attempts). Overcharging for low-value targets wastes windows elsewhere.
Target Profiles & Real Match Scenarios
- Wounded superheavies at range: If they’re ≤550 HP and angled, swap to APCR to guarantee the pen for the detonation. Don’t take a 50/50 AP gamble when a guaranteed kill ends a push.
- Fast mediums crossing: Preheat still helps—tighter bloom + 1.4 s aim lets you tag track + damage. Track them, finish later with a preheated execute when they’re forced to repair and re-peek.
- Light tanks in bushes: Don’t waste the rack clause—use AP to two-tap. Save max-charge for armored threats or decisive cleans.
Counter-Play (What punishes Hirschkäfer—and how to avoid it)
- Arty & HE blind fires: If several blind shells land near your bush, move. Your charge is worthless if your position is compromised.
- Track traps: Enemy teams will track you to force a speed spike while repairing, dumping your preheat. Counter by pre-angling to reverse into cover with minimal throttle input.
- Spaced armor & over-angling: Late game, savvy players will deliberately over-angle to bait a ricochet and deny your rack kill. Aim for weak-spots or swap to APCR to keep the pen deterministic.
When to Relocate (even if it hurts)
- Lane collapse: If the screen in front of you thins to one ally and two enemy silhouettes vanish from the minimap, relocate before you’re lit. A scuffed, un-preheated shot from a safer angle beats dying with a full charge.
- Stalemate math: If your lane offers only red outlines you can’t pen cleanly, you’re donating time. Shift to a 90° crossfire where the same targets present flat plates.
- Endgame rotations: Two-cap scenarios favor mobility. Use your 60 km/h top speed to pre-aim the likely approach, stop early, re-preheat, and greet them with a rack finisher.
Line Synergies & Team Play
- With active lights: Call for slow burns. Ask them to bleed heavies to sub-550, then hold spots. Your shot ends the trade instantly.
- With arty: Time your rack window right after a stun; stunned targets angle worse and eat clean pens.
- With hulldown heavies: Sit on their flank arc. As they force peeks, your preheated shot punishes every over-exposure.
Strv 107-12 — Tier XI Swedish Tank Destroyer
The Strv 107-12 doubles down on the Swedish siege-tank DNA but adds a brutal twist: Pillbox Mode. Tap the toggle and you morph into a fortified gun nest with accuracy numbers that most tanks can only dream of. Reload drops from 6.7s to 6.0s, aim time shrinks to a surgical 1.0s, and dispersion locks down to 0.23m—arguably the most accurate gun in World of Tanks history. The catch? Mobility collapses to a humiliating 1 km/h in Pillbox, turning you into a trench turret that can only pray its allies hold the line long enough for your shells to matter.
Strv 107-12 Stats & Playstyle
| Nation | Sweden |
| Type | Tank Destroyer (Siege / Pillbox) |
| Tier | XI |
| Successor to | Strv 103B |
| Unique Mechanic | Pillbox Mode — Fortified gun platform with superior accuracy and shorter reload. Mobility (forward/reverse speed and vertical/horizontal traverse) is severely limited. Tap X to toggle between standard Siege and Pillbox. |
| Firepower | |
| Average Damage (per shot) | AP: 390 | APCR: 390 | HE: 480 |
| Average Penetration (mm) | AP: 314 → 319 | APCR: 356 → 361 | HE: 53 |
| Dispersion at 100 m | 0.29 → 0.28 m |
| Dispersion at 100 m (Pillbox) | 0.24 → 0.23 m |
| Aiming Time | 3.0 s |
| Aiming Time (Pillbox) | 1.0 s |
| Gun Reload Time | 6.7 s |
| Gun Reload Time (Pillbox) | 6.0 s |
| Ammunition | 50 → 60 shells |
| Gun Depression / Elevation | −10° / +20° |
| Gun Traverse Limits | −18° → −20° / +18° → +20° |
| Survivability | |
| Hit Points | 1,950 → 2,000 |
| Hull Armor (front / sides / rear) | 50 / 30 / 30 mm |
| Mobility | |
| Top Speed / Reverse | 51 → 53 / 46 → 48 km/h |
| Top Speed / Reverse (Pillbox) | 1 / 1 km/h |
| Turret Traverse Speed | 16 °/s |
| Spotting & Camouflage | |
| View Range | 360 → 370 m |
| Concealment — Moving (%) | 15.33 / 3.20 |
| Concealment — Stationary (%) | 25.54 / 5.34 |
Insider tip: The Strv shines on open maps like Malinovka, Prokhorovka, and Steppes. Pick your lane early, drop into Pillbox, and let your scouts light up crossers. But if your flank collapses, un-sieging at 1 km/h is essentially a death sentence—rotate too late and you’re just another wrecked bunker on the field.
- Role in the roster: Lane-denial specialist. You’re the immovable object that punishes anyone foolish enough to peek.
- Gun handling flow: Out of Pillbox you’re solid—0.28 m dispersion, 3.0s aim. In Pillbox, you’re an alien laser: every shot feels like a railgun. The difference is night and day.
- Positioning templates:
- Open fields: Drop Pillbox on ridgelines with hard cover behind. Shoot for as long as scouts keep you fed. Reset if arty starts raining down.
- City maps: Forget Pillbox unless you can anchor a long boulevard. In alleys, you’ll suffocate without angles.
- Hybrid maps: (Redshire, Fisherman’s Bay) — pick zones where you can lock down one approach and force enemies into crossfires.
- Ammo discipline: AP at 314–319 mm pen handles most cases. Swap to APCR (356–361 mm) for superheavies and angled plates. HE (480 dmg) works against soft-skinned TDs and artillery—don’t ignore it if you’ve got vision support.
- Concealment synergy: Base stationary camo over 25% means you can fire from bushes with impunity if the double-bush rule is respected. Build setups around camo perks and equipment for maximum ghost-gun impact.
Strengths
- Pinpoint accuracy rivaling artillery precision.
What this means: At 0.23 m dispersion and 1.0 s aim time, you can thread shots into cupolas and weakspots other TDs don’t even try for. If you can see it, you can hit it—every time. This allows the Strv to dominate duels across 400+ meters where most guns rely on RNG. - Rapid-fire DPM with minimal aim time.
Practical edge: A 6.0 s reload with 390 alpha means you’re cycling over 3,900 DPM when stationary. Against distracted heavies, you’ll often land 2–3 punishing shots before they can even retreat. - Excellent stationary camouflage—over 25% with crew/perks.
Why it matters: Unlike the Hirschkäfer or Breaker, the Strv can hold its nest without being spotted until it fires. On vision-heavy maps, this lets you essentially play “invisible artillery,” picking apart pushes without ever being lit.
Weaknesses
- Immobile in Pillbox—easy prey for artillery.
Counterplay: Artillery and derp HE tanks love you. At 1 km/h you can’t dodge splash, so smart opponents will farm you out of bushes. Solution? Relocate between barrages or drop camo net + bush layers to delay detection. - Weak hull armor (50 mm front).
Implication: Virtually every Tier IX–XI gun overmatches you. If you’re lit, even mediums can pen you frontally without effort. Armor is cosmetic here—your protection is concealment and distance, not plates. - Dependent on team cover to function.
Why it hurts: If your flank crumbles, Pillbox turns into a coffin. You can’t flex, you can’t escape, and you can’t brawl. Unlike the Breaker that can brute force, or the Hirschkäfer that can relocate, you live or die on whether allies hold vision and angles for you.
Best Equipment & Consumables for Strv 107-12
- Improved Aiming Unit: Already razor-sharp accuracy becomes absurd. It’s win-more, but that’s the Strv’s whole deal.
- Gun Rammer: Pushes DPM past 4,000+ in Pillbox mode—insane lane control.
- Low-Noise Exhaust or Camouflage Net: Both keep you hidden longer. Exhaust is better if you swap lanes often; Net if you’re a pure bunker.
- Optional: Binocular Telescope. If your team lacks vision, you can self-light some approaches, though it forces a static bush playstyle.
- Consumables: Food (Onigiri equivalent), Large Repair Kit, and Large Med. Food is critical—tiny boosts to reload/aim stack multiplicatively in Pillbox mode.
Crew Skills & Directives
- Commander: Sixth Sense → Recon → Situational Awareness → Mentor.
- Gunner: Snap Shot → Deadeye → Designated Target.
- Driver: Clutch Braking → Off-Road Driving → Smooth Ride (for non-Pillbox flexing).
- Loader: Safe Stowage → Intuition → Adrenaline Rush.
- Directive: Increased Focus for vision control or Vent Purge if running Vents over Net.
Micro-Tech: Maximizing Pillbox Mode
- Pre-aim lanes: Commit to angles where enemies must appear (Prokhorovka rails, Malinovka hill). Don’t guess—force inevitability.
- Pulse fire: Abuse the 1.0s aim time. Peekers often jiggle to throw off TDs; the Strv simply ignores it. Fire instantly, punish jiggling heavies before they can re-angle.
- Stagger resets: Don’t sit forever in Pillbox. After 3–4 shots, if targets dry up, un-siege and rotate. Otherwise you become predictable and bait for arty.
Target Profiles & Real Match Scenarios
- Heavy tanks at choke points: With 356–361 mm APCR, you can cut through Maus or Type 5 weakspots at 400+ meters. Few other TDs can maintain that consistency.
- Mediums in open ground: Your reload lets you tag them twice before they close. On maps like Steppes, that turns pushes into suicide runs.
- Lights scouting ridges: Stationary camo lets you ambush them; one pen plus a tracking shot often deletes them before they even know they’re lit.
Counter-Play (How enemies punish Strv 107-12)
- Artillery: Top threat. Even non-penetrating splash cripples your DPM advantage. Expect every arty shell if you’re spotted.
- Flanking meds/lights: Once they’re in your side arc, you’re helpless. Your traverse is too slow to respond.
- Vision control: Aggressive lights that clear bushes ruin your setup. No vision = no Pillbox effectiveness.
When to Relocate (even if it hurts)
- Flank collapse: Don’t wait until enemies are on top of you. If your minimap shows red silhouettes evaporating allies, start packing up—even at 1 km/h it’s better than zero.
- No vision feed: If scouts die early, rotate to a secondary bush or angle where you can self-spot. Sitting blind wastes the Strv’s biggest edge.
- Cap pressure: Pillbox isn’t mobile enough to reset caps. Leave your nest if the enemy starts a cap race—you won’t arrive in time otherwise.
Line Synergies & Team Play
- With active lights: Best-case scenario. Scouts feed you endless targets, you shred them without ever being spotted.
- With hulldown heavies: Anchor behind them. As they bait fire, you rip through enemy weakspots with your surgical gun.
- With artillery: Perfect pairing. Arty stuns, you punish. The 1.0s aim window means you always capitalize before the stun ends.
AT-FV230 Breaker — Tier XI British Tank Destroyer
The British Breaker reimagines the Badger line by tying mobility to momentum. Its Direct Drive mechanic ramps engine power and top speed the longer you hold forward. At first glance, it looks like another slow-moving fortress stuck at 20 km/h. But give it runway, and the Breaker builds into a steadily accelerating juggernaut. On long approaches, this transforms it into a blunt-force spearhead—381 mm of frontal armor and steady DPM to crack defenses wide open. But if the map forces stop-and-go gameplay, the Breaker reverts into a sluggish bunker that can feel like dead weight.
AT-FV230 Breaker Stats & Playstyle
| Nation | UK |
| Type | Tank Destroyer (Assault / Direct Drive) |
| Tier | XI |
| Successor to | FV217 Badger |
| Unique Mechanic | Direct Drive — Passive acceleration mechanic: while holding forward, engine power and top forward speed ramp up over time, letting you surge across the map without toggling a mode. |
| Firepower | |
| Average Damage (per shot) | AP: 480 | APCR: 480 | HE: 620 |
| Average Penetration (mm) | AP: 278 → 283 | APCR: 326 → 331 | HE: 130 |
| Dispersion at 100 m | 0.30 m |
| Aiming Time | 1.7 → 1.6 s |
| Gun Reload Time | 8.1 s |
| Ammunition | 60 → 70 shells |
| Gun Depression / Elevation | −10° / +20° |
| Gun Traverse Limits | −18° → −20° / +18° → +20° |
| Survivability | |
| Hit Points | 2,150 → 2,200 |
| Hull Armor (front / sides / rear) | 381 / 127 / 57.2 mm |
| Turret Traverse Speed | 16 °/s |
| Spotting & Camouflage | |
| View Range | 390 m |
| Concealment — Moving (%) | 10.83 / 1.95 |
| Concealment — Stationary (%) | 18.07 / 3.25 |
| Mobility | |
| Engine Power | 750 → 800 hp |
| Specific Power | 10.7 → 11.4 hp/t |
| Traverse Speed (Hull) | 22 °/s |
| Top Speed / Reverse | 20 / 12 km/h (base; Direct Drive increases forward speed as you continue moving) |
Insider tip: Use maps with long lanes—like Karelia, Sand River, or Westfield—to spool up Direct Drive. Every time you stop or pivot, you reset your momentum advantage. Commit early, plan your lane, and keep the “W” key pressed. Hesitation kills this tank.
- Role in the roster: Frontline pressure TD. You’re not camping; you’re smashing through choke points with armor and sustained firepower.
- Gun profile: 480 alpha damage per shot, 8.1 s reload, 278–283 mm AP penetration, and 326–331 mm with APCR. Consistent, if not spectacular, but reliable enough when combined with high survivability.
- Armor layout: 381 mm frontal plate makes you an immovable wall against most Tier IX–X vehicles. Side armor (127 mm) and rear (57 mm) are weak—never overextend without cover.
- HP pool: 2,150 → 2,200 with upgrades, letting you soak punishment in pushes where lighter TDs would crumble.
- Mobility: Base 20 km/h top speed sounds awful, but Direct Drive lets you accelerate far beyond it if you maintain forward motion. Traverse speed (~22°/s) and turret traverse (~16°/s) limit agility in brawls.
Strengths
- Monstrous 381 mm frontal armor for head-on brawls.
Why it matters: You’re built to stare down corridors. Tier IX heavies bounce endlessly off your frontal slab, and even Tier X TDs need premium shells to consistently pen. This lets you anchor pushes and soak damage for your team. - Direct Drive allows faster map traversal over time.
Practical payoff: On open maps, you’ll surprise enemies who expect a 20 km/h crawl. By mid-lane, you’re barreling forward faster than your card suggests, letting you arrive at choke points ahead of schedule. - High HP pool for absorbing punishment.
In practice: With 2,200 HP fully upgraded, you can eat multiple penetrating hits and keep firing. Combined with DPM, you trade favorably against most heavies and TDs in prolonged slugfests.
Weaknesses
- Struggles on urban maps where constant braking kills momentum.
Map dependency: Himmelsdorf and Ensk are nightmares. Every corner forces you to reset Direct Drive, turning you into a 20 km/h brick. - Predictable forward vectors—easy to trap with crossfires.
Counterplay: Smart teams will bait you down linear lanes, then track you and punish from the sides. Your 127 mm sides don’t hold up under crossfire. - Moderate penetration for Tier XI; struggles versus superheavies.
Implication: Against Maus, Type 5, or angled E 100s, your 278–283 mm AP feels inadequate. APCR at 326–331 mm helps, but you’ll often need weakspot precision—hard to do mid-push.
Best Equipment & Consumables for AT-FV230 Breaker
- Gun Rammer: Core choice—keeps DPM competitive in protracted trades.
- Improved Aiming Unit: Tightens gun handling; critical when you need to land shots in brawls while armored up.
- Turbocharger: Synergizes with Direct Drive—accelerates baseline speed so you spool faster. Almost mandatory on open maps.
- Alternative: Hardening instead of IAUs if you want even more survivability in frontline pushes.
- Consumables: Large Repair Kit, Large Med Kit, and Food. Food amplifies reload and gun handling—worth the credit burn given how Breaker thrives on consistency.
Crew Skills & Directives
- Commander: Sixth Sense → Recon → Situational Awareness → Mentor.
- Gunner: Snap Shot → Deadeye → Designated Target.
- Driver: Clutch Braking → Off-Road Driving → Smooth Ride (to help while building momentum).
- Loader: Safe Stowage → Adrenaline Rush → Intuition.
- Directive: Stabilizer Greasing for gun bloom or Vent Purge for all-round stat padding.
Micro-Tech: Mastering Direct Drive
- Plan your lane: You must think two minutes ahead. Pick corridors where you can accelerate uninterrupted—sand dunes, valleys, open ridges.
- Don’t stop unless forced: Every reset puts you back at sluggish baseline speed. Even pausing to sidescrape can waste your mechanic.
- Momentum abuse: Use Direct Drive to crash early into strategic cover. Once you’re entrenched, your frontal armor and DPM force enemies into poor trades.
- Breaking camps: In long-range stalemates, your job is to spearhead. Absorb hits with your armor and let allies exploit the breach you open.
Target Profiles & Real Match Scenarios
- Mediums holding ridges: Your armor shrugs off their fire while you trade 480 alpha every 8 seconds. They’ll melt before you do.
- Superheavies: Difficult matchups. You must rely on weakspot knowledge and APCR spam. Without it, you waste momentum grinding uselessly into their armor.
- Lights attempting flanks: If tracked mid-spool, you’re vulnerable. Use allied cover or terrain to deny free side shots.
Counter-Play (How enemies punish Breaker)
- Crossfires: Breaker commits forward; punish it from sides and rear. Once tracked, its armor is irrelevant.
- City terrain: Force corners and tight alleys. Resetting Direct Drive every 10 meters keeps it permanently sluggish.
- HE spam: Despite armor, artillery and high-pen HE blunt its HP advantage. Breaker can’t dodge while accelerating in straight lines.
When to Relocate (even if painful)
- Dead lanes: If your push lane dries up, back off early. Staying static wastes your mechanic and bleeds map control.
- Cap scenarios: Don’t tunnel. If enemy caps while you’re stuck on the wrong flank, you won’t rotate fast enough—leave early to pre-spool toward the circle.
- Late game chases: Momentum makes you a surprisingly effective cleaner if space is open. Use Direct Drive to hunt down low-HP TDs or heavies trying to retreat.
Line Synergies & Team Play
- With heavies: Breaker is the battering ram. Pair with Maus/E 100 to overload choke points. Your armor absorbs, their alpha punishes.
- With mediums: Let them flank while you brute-force attention. Your frontal armor creates space for them to play wide.
- With artillery: Direct Drive pushes flush enemies out of cover. Arty follows up with splash while you keep pressure on exposed targets.
Matchmaking and Balance Concerns
Tier XI vehicles don’t exist in a vacuum—they’re fully integrated into battles with Tiers IX–X. To prevent chaos, Wargaming introduced role caps, limiting how many Tier XI vehicles of each class can appear per team. This safeguard is crucial: imagine three Strv 107-12s locking down open fields, or multiple Breakers bulldozing choke points. Without caps, matches could quickly spiral into one-sided stomps dominated by new mechanics rather than tactical variety.
Still, balance concerns remain at the center of community debate. Early testing and live-server feedback highlight three recurring problem areas:
- Hirschkäfer: The deterministic ammo-rack finisher, while situational, raises red flags. If left unchecked in late-game scenarios, a fully preheated Hirschkäfer could delete multiple low-HP targets in succession, creating snowball effects that swing battles instantly. Critics argue it’s “too binary”—either irrelevant if misplayed or game-ending if set up correctly.
- Strv 107-12: Pillbox Mode rewards precision and punishes movement. On vision-heavy maps, this can encourage static gameplay where teams camp lanes instead of rotating. Some worry it promotes trench warfare, slowing down the aggressive meta many players enjoy. On the flip side, it collapses if unsupported, so its impact depends heavily on map design and team coordination.
- AT-FV230 Breaker: The Direct Drive mechanic makes the Breaker feast-or-famine. On maps with long, open approaches, it dominates by spooling into an armored juggernaut. But in tight urban maps with constant braking, it feels sluggish and underwhelming. This inconsistency can frustrate both users and opponents, making it one of the most map-dependent Tier XI designs.
To mitigate these extremes, Wargaming’s Upgrades Node system plays a balancing role. Instead of handing players max stats the moment they unlock a Tier XI tank, the node progression forces incremental improvements. This ensures that players can’t immediately exploit the most oppressive values—such as the Strv’s 0.23 m dispersion or the Hirschkäfer’s wider gun arcs—without putting in significant grind. In effect, it softens the learning curve and stretches out the meta impact of these TDs.
Bottom line: The matchmaking framework and progression gates are deliberate guardrails. While unique mechanics add spice to Tier XI destroyers, they also amplify risks of imbalance if role caps and upgrade pacing weren’t in place. The system isn’t perfect, but it’s a conscious attempt to preserve competitive fairness across tiers.
Conclusion
The World of Tanks 2.0 update tech tree Destroyers Tanks tier 11 brings far more than inflated stats—it introduces fundamentally new ways to play tank destroyers at the very top of the tech tree. Each of the three Tier XI TDs offers a distinct identity shaped by its unique mechanic, forcing players to adapt their strategies and master new tradeoffs rather than relying on raw power creep.
The German Hirschkäfer is a precision assassin, punishing hesitation with its Preheat System and turning endgame duels into checkmate scenarios when it executes ammo-rack shots. The Swedish Strv 107-12 doubles down on the classic S-tank style, but its Pillbox Mode turns it into a near-immovable bunker that can dominate open lanes—at the cost of extreme immobility. Meanwhile, the British AT-FV230 Breaker is a rolling fortress, using Direct Drive to transform momentum into map pressure, provided the terrain allows it.
Together, these vehicles raise the skill ceiling at Tier XI rather than flattening it. Success depends on patience, planning, and exploiting each tank’s mechanic at the right moment. For competitive-minded American players, these destroyers represent three paths to mastery—surgical lethality, fortified precision, or unstoppable armored momentum.


